Ad blockers are great—until you realize they only work inside your browser. What about the endless stream of ads in other apps on your phone? From games to news apps to social media, most ad blocking tools don’t even touch them. That’s where Pi-hole comes in, offering true network-level filtering that stops ads and trackers before they ever reach your device.
By combining Pi-hole with Tailscale, you can take that protection beyond your home network and into the world. Tailscale creates a secure VPN mesh that lets your devices connect to your home network from anywhere. That means your phone, tablet, or laptop can use your self-hosted Pi-hole DNS server—even when you’re on mobile data or public Wi-Fi.
And, because Pi-hole is fully self-hosted (unlike cloud-based filtering services), your DNS activity stays entirely under your control. No subscriptions, no data mining—just a fast, reliable, and private way to block ads and trackers across all your apps, wherever you go.
How does this work
Before we jump into action, let's quickly review how all the pieces fit together.
Pi-hole is a free, open-source, network-wide ad blocker that functions as a DNS sinkhole, blocking unwanted content like ads, trackers, and malware on your entire network without requiring any client-side software installations.
Tailscale is a modern, easy-to-use VPN service that simplifies connecting devices and services securely across different networks. Tailscale creates a "mesh" VPN, meaning devices connect directly to each other, rather than going through a central server, which can improve performance and security.
Here's how those components come together:
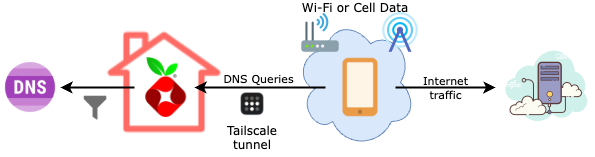
- Tailscale runs both on your Pi-hole server and on your phone or tablet. It establishes an encrypted connection between them, giving your phone a secure path to access Pi-hole, even when you are not connected to your home network.
- Tailscale's DNS override feature directs all DNS queries from your phone or tablet to your Pi-hole. That means every app—browser, games, social media, and more—relies on Pi-hole for domain name resolution.
- Pi-hole filters those DNS queries, blocking known ad and tracker domains before they ever resolve. Your device never contacts those servers, cutting most ads off at the source.
- Any other internet traffic from your phone or tablet goes through your regular internet connection. That means web traffic, videos, and downloads still use your cellular provider or Wi-Fi—only DNS is routed through Tailscale and Pi-hole.
What You'll Need
You are probably already running a Pi-hole instance at home to protect all devices on your network from ads and internet tracking sites. If you're not, the article Pi-hole: Ad-blocking for all your devices will get you up and running fast.
You'll also need to have a Tailscale account. Setting one up is quick, easy and free from their website.
We will be using Portainer to deploy Tailscale to your Pi-hole. If you haven't set up your Pi-hole host to support deployments via Portainer, make sure to check out the article Portainer Agent: Managing Containers Across Servers.
Step-by-Step Guide
From a high level point of view, the steps to get things set up are as follows. We will cover each in more detail further below.
Step 1: Get an Authorization Key From Tailscale
The easiest way to authorize Tailscale on the Pi-hole server is by using an authorization key. To do this, from a desktop or laptop:
- Navigate to to the Settings page of your Tailscale dashboard.
- On the left-side section, select Keys under Personal Settings.
- Click on Generate auth key.
- The default settings should be fine for our use case. If you want, you can give the key a useful description, like "Pi-hole".
- Click on Generate key.
- Copy the newly generated key (or keep your browser window open until we complete the next step).
Step 2: Install Tailscale on Your Pi-hole Server
As we've done with other self-hosted software, for better convenience, isolation and control, we're going to use Portainer and Docker to deploy Tailscale to our server running Pi-hole.
- Log into your Portainer Server admin website. Make sure you have configured Portainer to load App Templates from our GitHub repository.
- From the Home dashboard, select the Environment for the server where you want to deploy Pi-hole.
- Under Templates > Application, search for and select the template for Tailscale.
- Under Configuration,
- Type
hostin the textbox for Network - Enter the authorization key from the previous step under Auth Key
- Type
- Click on Deploy the container
Step 3: Disable Tailscale Key Expiration
Tailscale normally expires the authorization key on clients connected to your Tailnet, requiring you to log back periodically. While this is good practice in clients such as your phone or laptop, it's not convenient on a headless server like our Pi-hole.
- Navigate to the Machines page of your Tailscale dashboard.
- Locate the machine that is running Pi-hole. This should be the hostname of the machine where we just installed Tailscale in the previous step.
- Click on the contextual menu (three-dots) at the end of the row.
- Click on Disable key expiry on the pop-up menu.
- Now, click on the drop-down menu that has the IP address of your Pi-hole machine and copy the IPv4 address (e.g.
100.xx.yyy.z). You will need this address in the next step.
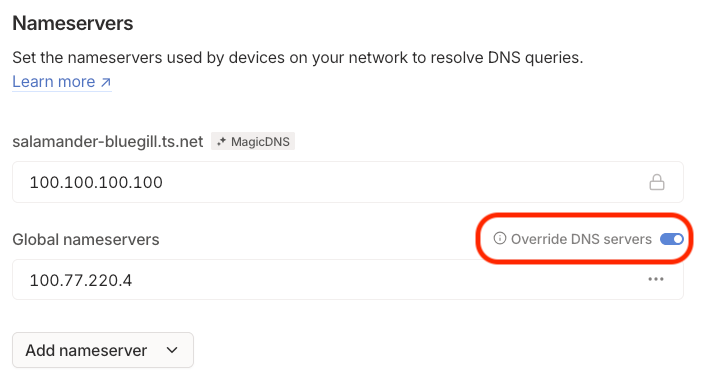
Step 4: Add Your Pi-hole As Global Nameserver
The last step is to have Tailscale advertise our Pi-hole as the default DNS server for any device that is actively connected to our Tailnet.
- Navigate to the DNS page of your Tailscale dashboard
- Look for the section Nameservers and click on the button Add nameserver, then select Custom... from the drop-down menu.
- Enter the Tailnet IPv4 address of your Pi-hole server, which you copied in the last step. Then hit Save.
- Make sure the option Override DNS servers is enabled.
Step 5: Enjoy Fewer Ads and Stronger Privacy 🎉
You’re almost there! With the infrastructure in place, the final step is to connect your mobile devices to your Tailnet so they can start using your Pi-hole—anywhere you go.
- Install the Tailscale app on your phone or tablet from the App Store (iOS) or Google Play (Android).
- Sign in using the same account you used when setting up Tailscale (I used my Google account, but other login providers work too).
- Connect to your Tailnet. On Android, just toggle the switch in the top-left corner of the Tailscale app. On iOS, tap the “Connect” button on the main screen.
Once connected, Tailscale automatically routes all DNS queries from your device to your Pi-hole. That means every app on your phone—browser, games, social media, and more—gets filtered through your self-hosted ad blocker. No browser extensions, no sketchy third-party apps—just clean, private internet on your terms.
A Note on Security
In the setup described in this article, only DNS queries from your phone to Pi-hole travel through the encrypted Tailscale tunnel. Once a domain name (like facebook.com) is resolved to an IP address, your phone connects to that server directly using your normal internet connection—whether that’s mobile data or public Wi-Fi.
This means Tailscale and Pi-hole do not encrypt or protect your app’s web traffic—they only filter out unwanted domains before any connection is made. Most apps and websites use secure HTTPS connections, but it’s still important to be cautious, especially on open networks like coffee shop Wi-Fi where bad actors might attempt to intercept or manipulate traffic.
If you’re used to running a full VPN for privacy on public networks, there’s one key thing to note: most devices don’t allow Tailscale to run alongside a traditional VPN. This means you have to choose between Pi-hole’s filtering and your VPN provider’s encrypted tunnel for all traffic. But don’t worry—there’s a workaround. In an upcoming post, I’ll show you how to use a VPN exit node inside your Tailnet, so you can get the best of both worlds: Pi-hole DNS filtering and full VPN protection. Stay tuned!
What's next
You’ve just leveled up your Pi-hole setup by extending its protection to your mobile devices—wherever you go. With Tailscale, your phone now benefits from network-level ad and tracker blocking on any connection.
Want to keep building on this foundation? Here are a few ideas to get more out of your setup:
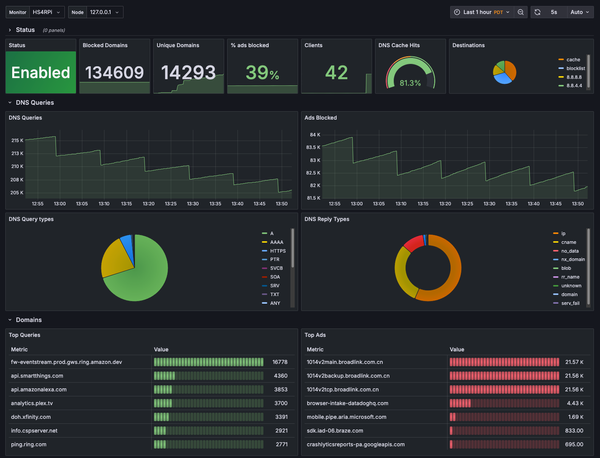
- Monitor Pi-hole with Prometheus + Grafana. If you already use Prometheus and Grafana to monitor your infrastructure, check out pihole-exporter. It integrates your Pi-hole metrics into your dashboard, giving you real-time insight into query volume, block rates, and more. Stay tuned—I’ll walk through this setup in a future post.
- Quick controls via browser extension. Want to quickly pause or manage Pi-hole without logging into the admin interface? There is a browser extension for Chrome (and other Chromium-based browsers) and Firefox that hook into the Pi-hole API. With a single click, you can enable/disable blocking or add the current page’s domain to your allow- or block-list—handy for those moments when something legitimate gets caught in the filter.
- Use a VPN exit node inside your Tailnet with Gluetun. Want the benefits of Pi-hole and a full VPN simultaneously? Set up a VPN exit node using Gluetun on your Tailnet. This lets you route all traffic from your mobile device through a VPN, while still using Pi-hole for DNS filtering. Stay tuned—I’ll dive into this advanced setup in a future post!