Creating a HomeSeer rPi image
Build a better HomeSeer Raspberry Pi image: 64-bit OS, smaller size, and systemd service support.


Stardate: -297802.96052130894
After struggling with the official HomeSeer Raspberry Pi image, I decided it was time to build something better. Faster. More efficient. Something that truly takes advantage of the hardware.
While HomeSeer provides a prebuilt image, I encountered a few issues that made it less than ideal:
- The OS: The official image runs a 32-bit version of Raspberry Pi OS, limiting access to the full RAM available on higher-spec models. Given that I went out of my way to get better hardware, I want HomeSeer to take full advantage of it.
- The File Size: At 4GB, the existing image is bulky and takes a long time to download. On top of that, it’s compressed as a ZIP file rather than an XZ archive, requiring an extra step before burning it to an SD card.
- Service Management: HomeSeer is launched via a startup script instead of a systemd service. This makes it difficult to control remotely via SSH—terminating the Mono process manually just causes it to respawn.
Mission Objectives
To solve these issues, I set out to create a better HomeSeer Raspberry Pi image with the following improvements:
- Use a 64-bit OS to fully utilize available system resources.
- Reduce the file size for faster downloads and easier deployment.
- Run HomeSeer as a systemd service for better management and remote control.
Warp Speed: Skip to the Final Image
To save you the trouble of reading the rest of the guide, if all you need is access to the final image, you can download it from here: https://files.thedebugged.life/images/HS4RPi_64v1.img.xz
You can flash into your own Raspberry Pi using the steps from our previous article:

Launch Sequence: A Step-by-Step Guide
For this guide I strongly recommend using a small-capacity SD card, of 8GB or less, like this one. Doing this will reduce the amount of time spent generating and modifying the intermediate .img file
Phase One: Booting the 64-bit OS
The first step is to boot the Raspberry Pi into the official base image for the 64 bit OS.
- Grab the base image from the official site. Choose the Raspberry Pi OS Lite version since we won't need support for desktop.
- Use the Raspberry Pi Imager software to flash the image into a new SD card.
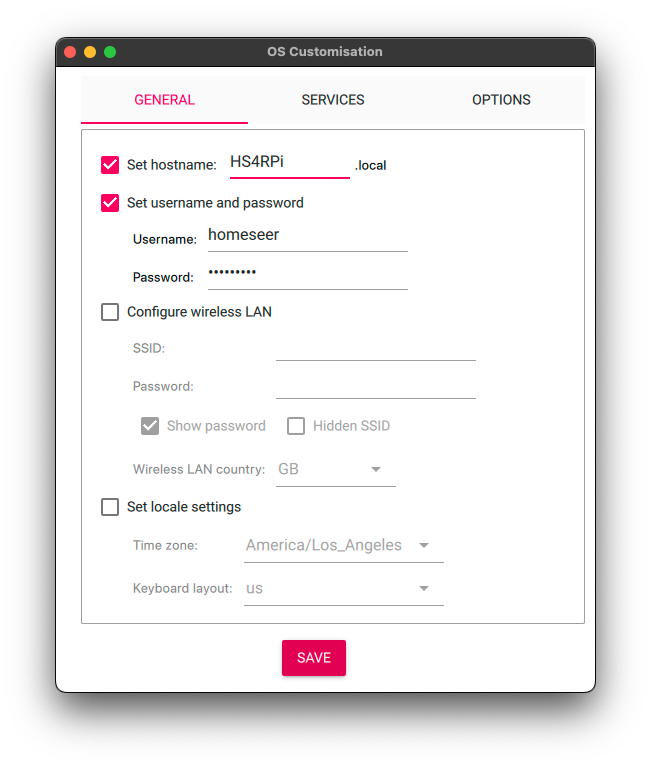
- When asked if you want to customize the OS, click on Edit Settings
- Set hostname to
HS4RPi - Set username to
homeseerwith passwordhsthsths4 - Optional: Configure WLAN if you don't plan to plug an Ethernet cable
- Under Services make sure Enable SSH is selected with password authentication
- Set hostname to
- Once the process completes, remove the card from your computer and insert it into the Raspberry Pi, then boot into it.
- If you did not configure the WiFi earlier, make sure to plug a cable into the Ethernet port.
- After a couple minutes, you should be able to ping the Raspberry Pi from another machine on the network using the address
ssh [email protected]
antonio@Antonios-MacBook-Pro ~ % ssh [email protected]
The authenticity of host 'hs4rpi.local (2601:600:a400:abe4:4e1a:8671:f9fc:3484)' can't be established.
ED25519 key fingerprint is SHA256:tHyHJNAh81S7KIa7Gxd+RlAff8oImalSHKc2NkJ0H24.
This key is not known by any other names.
Are you sure you want to continue connecting (yes/no/[fingerprint])? yes
Warning: Permanently added 'hs4rpi.local' (ED25519) to the list of known hosts.
[email protected]'s password:
Linux HS4RPi 6.6.74+rpt-rpi-v8 #1 SMP PREEMPT Debian 1:6.6.74-1+rpt1 (2025-01-27) aarch64

The programs included with the Debian GNU/Linux system are free software;
the exact distribution terms for each program are described in the
individual files in /usr/share/doc/*/copyright.

Debian GNU/Linux comes with ABSOLUTELY NO WARRANTY, to the extent
permitted by applicable law.
Phase Two: Prepare the OS with HomeSeer and Tools
Next, we need to install HomeSeer and set it to start automatically on boot. We will also install a few tools that will come handy later down the road, like Git, Docker, etc.
- Change the password for root with
sudo passwd rootand set it tohomeseerpi - Run the following script to complete the setup:
wget -qO- https://files.thedebugged.life/scripts/homeseer/hs4rpi_image_setup.sh | shPhase 3: Install PiShrink
PiShrink is a handy tool that will let us compress the size of the image file by relocating all used sectors, removing blank space and compressing the final image. This tool can run from either Linux (natively) or Windows/Mac (using docker).
To install it on Linux:
sudo apt update && sudo apt install -y wget parted gzip pigz xz-utils udev e2fsprogs
wget https://raw.githubusercontent.com/Drewsif/PiShrink/master/pishrink.sh
chmod +x pishrink.sh
sudo mv pishrink.sh /usr/local/bin
To install it on Mac:
git clone https://github.com/Drewsif/PiShrink && cd PiShrink
docker build -t pishrink .
echo "alias pishrink='docker run -it --rm --platform linux/amd64 --privileged=true -v $(pwd):/workdir pishrink'" >> ~/.bashrc && source ~/.bashrc
Phase 4: Creating the Final Image
Almost there. The last step is to create a new image file with all the modifications we just made.
- Take the SD card out of the Pi, insert into a Mac or Linux machine.
- On a Mac, make sure to umnount the disk first (if it gets auto-mounted). If you need to find the device name:
diskutil list
- On a Mac, make sure to umnount the disk first (if it gets auto-mounted). If you need to find the device name:
sudo dd if=/dev/disk6 of=HS4RPi_64v1.img bs=4M status=progress
sync- Shrink and compress the IMG file, using the PiShrink tool we installed earlier.
- On Linux
sudo pishrink.sh -aZ HS4RPi_64v1.img- On Mac:
sudo pishrink -aZ HS4RPi_64v1.imgThe output of the last command will give out the final product:HS4RPi_64v1.img.xz
Final Transmission: Next Steps
We reached our destination and achieved our original objective. We have now an image with a 64-bit version of Raspberry Pi OS. This file takes about 1.0GB once compressed, and also can be loaded directly into the Raspberry Pi Imager so there is no need to extract the file. And, HomeSeer runs as a systemd service!
Now we can use this image while following the steps from Running HomeSeer on Raspberry Pi. Any time we log into the Rasbperry Pi using SSH, we will now be able to do the following:
# Stop HomeSeer
sudo systemctl stop homeseer

# Start HomeSeer
sudo systemctl start homeseer
Lowering Deflector Shields
Sometimes, to truly understand what’s happening under the hood, we have to drop our defenses and take a closer look. Let's dive deeper into the details of the steps we took earlier.
The Image Preparation Script
For convenience purposes, we wrapped all the image preparation steps into a script. This script is meant to run upon first boot on a clean Raspberry Pi OS image. Let's take a closer look at what the script actually does:
#######################################
# RASPBERRY PI IMAGE CREATION FOR HS4 #
#######################################

#  Go to home folder

cd

#  Install useful apps

sudo apt install -y ssh vim git curl htop

#  Enable SSH service

sudo systemctl enable ssh

#  Install docker

curl -fsSL https://get.docker.com | sh
sudo usermod -aG docker homeseer

#  Install mono

sudo apt-get install -y mono-complete

#  Install VBNC (for VB script support)

sudo apt-get install -y git autoconf automake libtool make gettext
git clone https://github.com/mono/mono-basic.git
cd mono-basic
./configure --prefix=/usr
make
sudo make install
cd ..
rm -rf mono-basic

#  Install other HS dependencies

sudo apt-get install -y flite aha ffmpeg alsa-utils

#  Uninstall britty

sudo apt-get remove brltty

#  Get latest HS4 distribution

wget https://homeseer.com/updates4/linux_4_2_22_4.tar.gz

#  Create run folder and unpack

sudo mkdir -p /usr/local
sudo tar -xvf linux_4_2_22_4.tar.gz -C /usr/local
sudo rm /usr/local/HomeSeer/Data/HS4Data.json/*

#  Create homeseer service

sudo wget -O /etc/systemd/system/homeseer.service https://files.thedebugged.life/scripts/homeseer/homeseer.service
sudo wget -O /usr/local/HomeSeer/stop_homeseer.sh https://files.thedebugged.life/scripts/homeseer/stop_homeseer.sh
sudo chmod +x /usr/local/HomeSeer/stop_homeseer.sh
sudo systemctl enable homeseer

#  Cleanup workspace and reduce final image size

sudo apt autoremove -y
sudo apt clean
sudo journalctl --vacuum-time=1d
sudo rm -rf /var/log/*
sudo rm -rf /tmp/*
sudo rm -rf /var/tmp/*

#  All steps completed successfully, ready to shut down

echo -e "\e[32mAll steps completed, ready to shut down!\e[0m"

#  Remove bash history and shut down

rm ~/.bash_history
The HomeSeer Systemd Service Unit
Let's take a closer look at the files we copied over to enable running HomeSeer as a systemd service.
First, this is the unit definition that tells systemd how to start and stop, as well as its runtime dependencies:
[Unit]
Description=HomeSeer
After=network-online.target
Wants=network-online.target

[Service]
# User=antonio
WorkingDirectory=/usr/local/HomeSeer
ExecStart=/bin/bash -lc ./go
ExecStop=/bin/bash ./stop_homeseer.sh
Restart=on-failure

[Install]
WantedBy=multi-user.target
The startup script /usr/local/HomeSeer/go is the default provided by HomeSeer and all it does is launch the HomeSeer executable (HSConsole.exe) using mono.
However, we provided our own script to stop HomeSeer: /usr/local/HomeSeer/stop_homeseer.sh which does a graceful termination of the main process. Without this, systemd would simply terminate mono with a SIGINT signal, which isn't something the HomeSeer process is listening for.
Instead, we make a couple of synthetic requests to simulate a user shutting down HomeSeer through the Web UI:
#!/bin/bash
# stop - stop the HS application
# supports: HS application shutdown

hsroot=$(dirname $0) # where this script lives

# import login credentials used to login to web server
# these are ignored if password not required
inifile=$hsroot/Config/$(basename $0 .sh).ini
login=
test -r $inifile && . $inifile

# extract web server port from settings.ini
webport=$(awk -F= '\
{
gsub("\015", "") # remove CR character
if ($1 == "gWebSvrPort") print $2
}
' $hsroot/Config/settings.ini)

# extract web server address binding, if specified
binding=$(awk -F= '\
{
gsub("\015", "") # remove CR character
if ($1 == "gServerAddressBind" && $2 ~ /^[0-9]*\.[0-9]*\.[0-9]*\.[0-9]*$/) print $2
}
' $hsroot/Config/settings.ini)

# send application shutdown command
for i in $(seq 1 3)
do
curl -f -s -m 5 -o /dev/null ${login:+-u} $login --data 'ConfirmShutdownhs=Yes' "http://${binding:-localhost}${webport:+:}$webport/LinuxTools"
rc=$?
test $rc -eq 0 && break
curl -f -s -m 5 -o /dev/null ${login:+-u} $login --data 'action=shutdown_hs' "http://${binding:-localhost}${webport:+:}$webport/system.html"
rc=$?
test $rc -eq 0 && break
sleep 2
done

killmain()
{
test -n "$MAINPID" && kill -0 $MAINPID && kill $MAINPID
}

trap killmain EXIT

# if curl cmd unsuccessful, terminate main process
test $rc -ne 0 && killmain

# wait until all HomeSeer mono processes terminate, with timeout
maxwait=300
polltime=5
mono=$(which mono) || exit
for (( t=0; t<$maxwait; t+=$polltime ))
do
pgrep -afi "$mono.*(HSConsole|HSPI_)" || break
sleep $polltime
done

echo "Homeseer service successfully shut down."
If we do not terminate HomeSeer gracefully with a strategy like this, it could lead to data integrity issues in HomeSeer or any of its plug-ins when stopped.