Using a Custom Domain with Gmail
Your own email, your own domain: a simple guide to personalize your email address without switching inboxes.


Having a custom email address on your own domain (e.g., [email protected]) gives you a professional and polished online presence. It’s an easy way to establish credibility, whether for personal branding, freelancing, or business use. But many people assume that setting up a custom email address means paying for a hosted email service like Google Workspace or Microsoft 365. The good news is, you don’t have to!
In this guide, I’ll walk you through how to set up a custom email address using your own domain, while still using your Gmail inbox to manage, send and receive email. This approach is cost-effective or even free (depending on the volume of email you send), gives you full control over your email setup, and lets you avoid monthly subscription fees for hosted email solutions.
What You Need Before Getting Started
This guide does not cover the process of creating a custom domain or moving an existing domain from another DNS registrar to Cloudflare. If you do not already have a domain, you can purchase one for less than $10USD a year using the Cloudflare Registrar. If you already have a domain hosted in another DNS registrar (e.g. Namecheap, Name.com, etc.) transferring your domain to Cloudflare should be relatively easy, depending on your current setup. If this is not an option for you, check out the rest of the guide for an overview. Then, lookup the documentation on your DNS registrar for how to perform email forwarding or email redirection. For example, see these support articles on how to setup email forwarding for Namecheap and Name.com.
How Email Works: an Overview
We all use email on a regular basis and we are deeply familiar with how to use and manage our Gmail inbox. We use our email from our phones, tablets and laptops. It may seem simple to type a new email and hit Send but, what happens under the hood, in order for our message to find its way to the recipient, is an orchestration of multiple systems working together. Understanding the basics of how email flows from sender to recipient will be helpful once you configure your own custom email domain.
Here are some important concepts to understand, as part of the process of sending and receiving email:
- MTA (Mail Transfer Agent) is a software component responsible for routing and delivering email messages between servers. In a single email transaction, there are normally two (2) MTA involved, the sender's MTA and the recipient's MTA (which could be one and the same if both sender and recipient are on the same company, for example). An example of a popular MTA is Microsoft Exchange.
- SMTP (Simple Mail Transfer Protocol) is the protocol used to send emails from email clients to a mail (MTA) server, and to transfer emails between different servers. It defines how emails are formatted, transmitted, and delivered over the internet. MTA servers use SMTP to deliver emails, which is why they are also commonly referred to as SMTP Servers.
- DNS (Domain Name System) is a global system that translates human-friendly domain names (e.g.,
yourdomain.com) into IP addresses, directing internet traffic to the correct servers for websites, email, and other services. The internal records in a DNS server that define the mapping of domain to IP address are referred to as A or AAAA records. There are other kinds of records that can be defined in a DNS, such as CNAME records (mapping from one domain to another), TXT records (returns a simple text record), as well as... - MX (Mail Exchange) Record is a type of DNS record that specifies the mail server responsible for receiving email messages for a domain. When someone sends an email to
[email protected], the sender’s MTA looks up the MX record foryourdomain.comto determine where to deliver the message.
With the above concepts in mind, at a very high level, the journey that a single email follows, from sender to recipient, can be summarized in the following sequence:
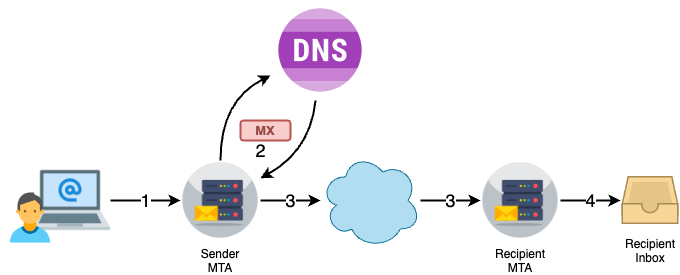
- The sender email client (e.g. Gmail) places the email request to the sender's MTA (e.g. their workplace Exchange Server).
- The sender MTA looks up the the MX record for the recipient's email domain. For example, when sending an email to
[email protected], the MTA will lookup the MX record fortheirdomain.com. - The email is routed to the recipient MTA through the internet using SMTP.
- After receiving the email, the recipient MTA will perform any necessary processing (e.g. scan for SPAM or viruses) before routing the email to the appropriate inbox.
What We'll Get After Following This Guide
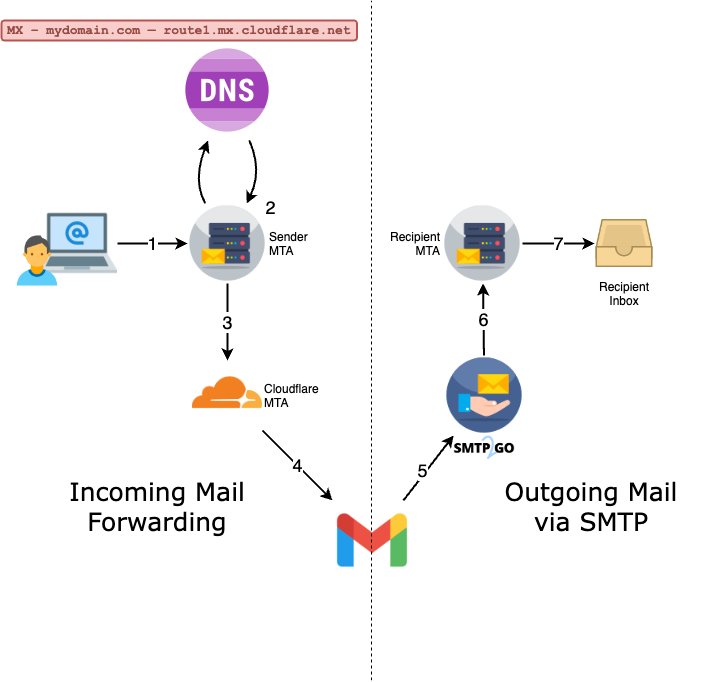
Now that we're caught up on how email normally works, let's review what we are trying to accomplish and what our setup will look like at the end of this guide. For simplicity, we can break down the rest of this guide into two different tracks:
- Setting up Email Forwarding: We will setup Cloudflare as the mail provider for our new email address. For example, if the new address is
[email protected]then the DNS settings formydomain.comwill have one or more MX records pointing to Cloudflare's mail (MTA) servers. - Configuring an SMTP Server for Outgoing Mail: We will configure an SMTP server to send email from our new domain using SMTP2GO. Then, we will configure Gmail to use that SMTP server every time we send email with that domain in the FROM MAIL address.
Once we are done with both parts, the workflow for receiving and sending emails with our new email address will look similar to the following:
Setting up Email Forwarding for Incoming Mail
The first thing we are going to do is to configure our custom domain so that email sent to a designated address (e.g. [email protected]) is routed to our existing Gmail inbox. To do this:
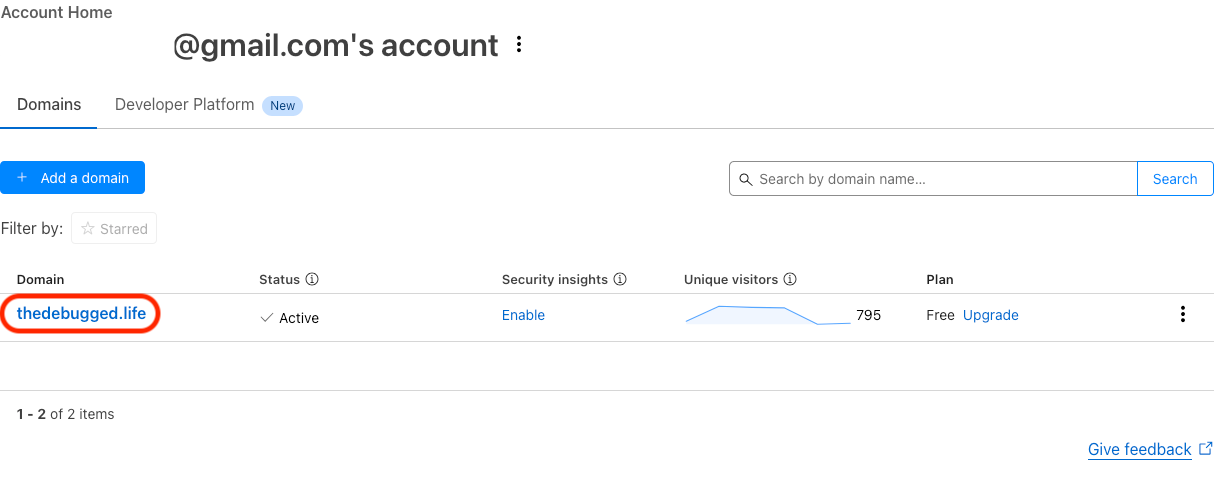
- We log into our Cloudflare Dashboard
- From the home page of your Dashboard, select the domain we want to manage. This is the domain where we want to setup Email routing.
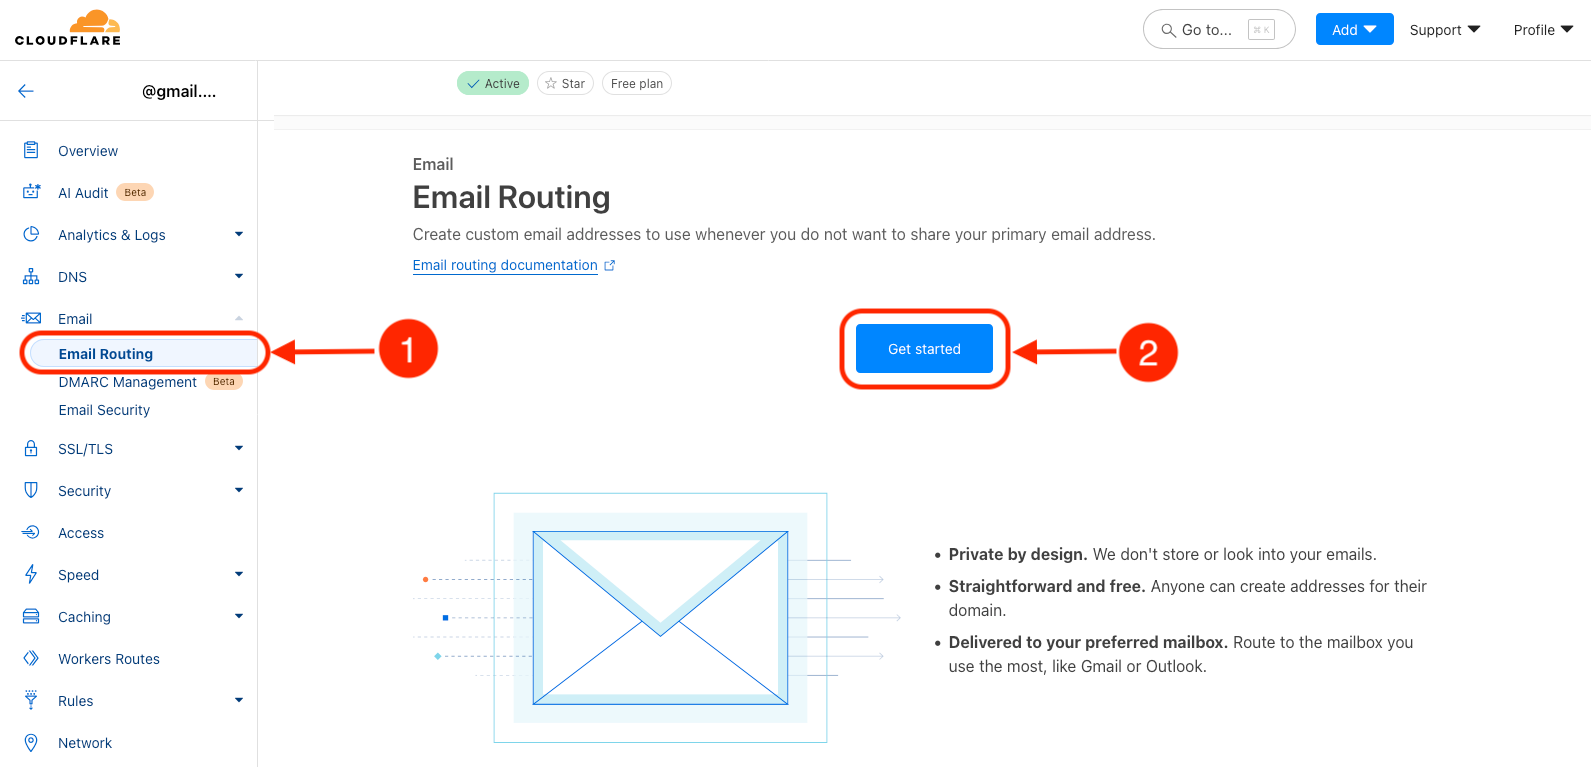
- On the left-side menu, navigate to Email > Email Routing. In the main panel, click on Get started.
- The next screen will be a dialog that helps us setup our email forwarding configuration. In this dialog we need to enter the custom address we want to create, for example,
[email protected]. Next, we enter the email address where emails should be forwarded, that is, our existing@gmail.comaddress. When done, click on the Create and continue button.
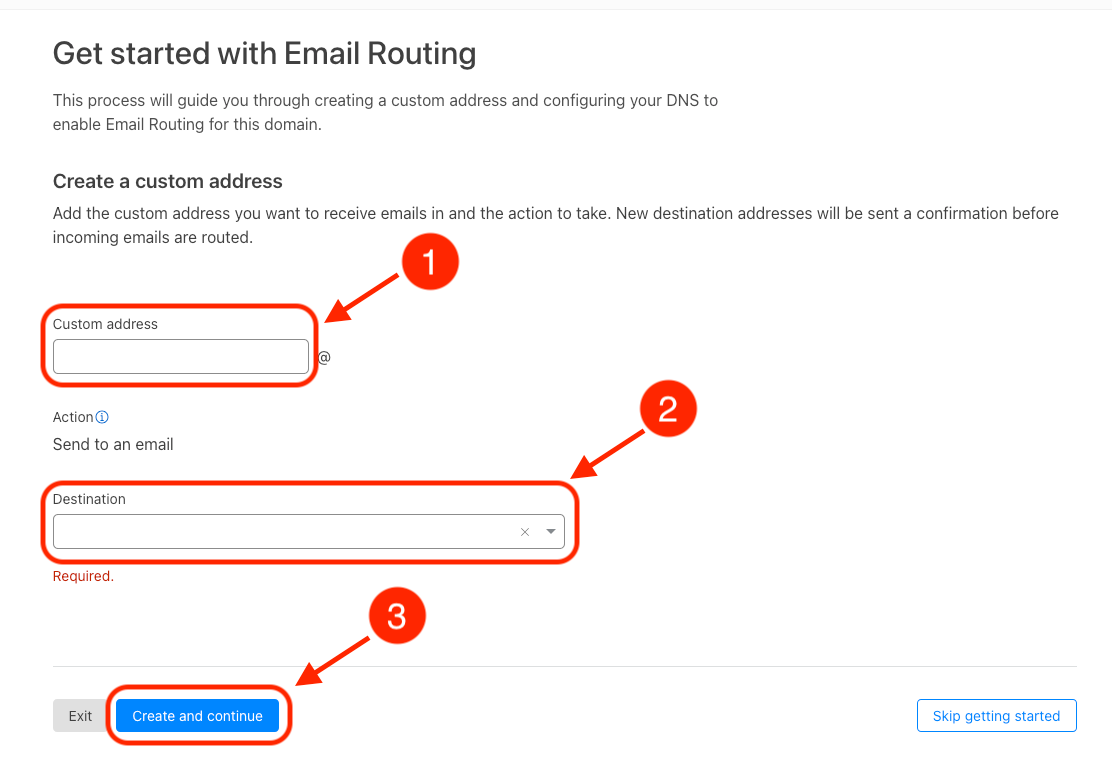
- The follow 2 screens are confirmation dialogs that show the configuration that will be applied to our domain, including new MX and TXT records. We can simply select the default button to continue.
At this point our new email address has been configured for routing. Any email sent to the new email address we just created will be forwarded to our Gmail inbox.
Go ahead and send yourself an email to verify everything is working as expected.
Configuring an SMTP Server for Outgoing Email
In order for our Gmail client to send messages using our new custom domain address as the MAIL FROM address, we need to route our outgoing email through a different SMTP server.
There are several options available for SMTP servers. The two providers that I recommend are AWS Simple Email Service (SES) and SMTP2GO. Both options have very good delivery reliability with a free-tier, but there are some minor differences:
| AWS SES | SMTP2GO | |
|---|---|---|
| Duration | 12 months, then 100% pay-as-you-go |
Free tier never expires |
| Capacity Limits | 3000 messages per-month | 1000 messags per-month 200 messages per-day |
| Additional Capcity | $0.10 per 1000 messages | Requires upgrading plans |
For domains that were created within the previous 3-months, SMTP2GO applies an additional rate-limit of 25 emails per-hour on free-tier plans.
I personally use AWS SES because I already have an AWS account and, considering the amount of email I write for personal purposes, even after running out of free-tier coverage, I do not expect to pay more than $1 USD a year on the service.
However, in this guide we will be using SMTP2GO because the configuration of the service is considerably simpler. A follow-up guide will provide details on how to configure AWS SES, if you prefer to use that service instead.
No matter which service you pick, you can always switch between them (or any other SMTP provider) in the future. It requires only a small configuration change on your email client, and your email recipients won't notice the difference.
Configuring SMTP2GO
- If you already have an account, log in to your SMTP2Go dashboard, otherwise head to SMTP2GO.com to create a new one.
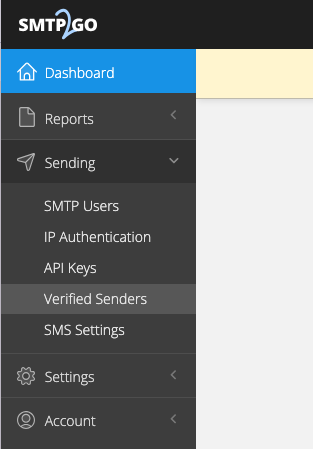
- Once we are on our SMTP2GO dashboard, from the right-side menu, select Verified Senders under Sending
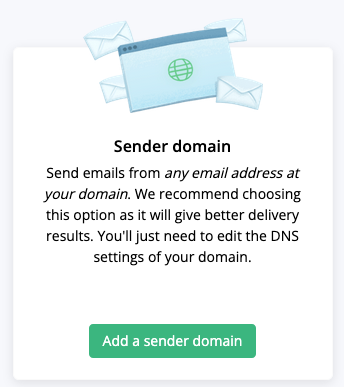
- From the main panel, select Add a sender domain
- In the screen that follows, we enter our custom domain
- The next screen will ask to configure three (3) DNS records on our domain. Keep this browser tab open—we will need it in later steps.
- In a new browser tab/window, head to your Cloudflare Dashboard. In our Account home page, select the domain we want to configure (same one we added to SMTP2GO a few steps back).
- On the right-side menu, select DNS and under it, the Records option.
- Next, for each of the three (3) records that are displayed in the SMTP2GO tab, we will take the following steps in the Cloudflare Dashboard:
- Click on Add record
- Select CNAME as the record Type
- Enter Name and Target as indicated in the SMTP2GO screen
- Make sure to disable the Proxied option.
- Hit the Save button

- Now, back on the SMTP2GO tab, click the Verify button. We should see a successful validation of the new domain.
We are done setting up an SMTP server to send email with your new address. Next, we will configure your email client to use this server.
Connecting SMTP2GO to Our Gmail Client
Once SMTP2GO is set up to send emails from our new domain, the final step is to configure our Gmail client to send emails through SMTP2GO. This allows us to compose emails from our custom domain address using the familiar Gmail interface.
First we need to get a set of SMTP credentials that can be used to send emails through SMTP2GO. To do this:
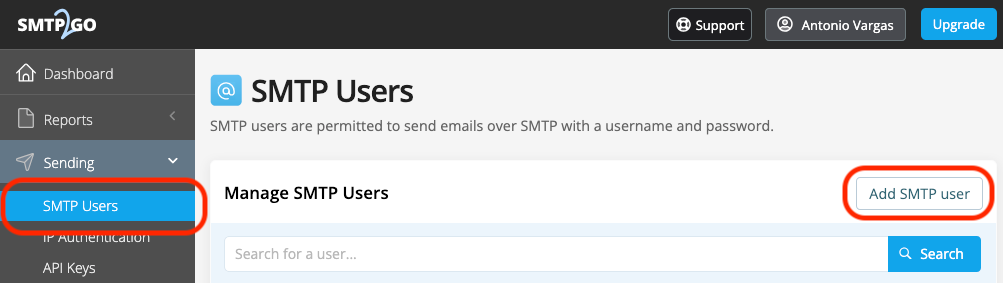
- Head back to the SMTP2GO dashboard.
- Expand the Sending section of the right-side menu, then select SMTP Users.
- On the main panel, click on Add SMTP user.
- In the screen that follows, enter a username and password. These should be different than the ones used to sign into Gmail.
- Keep the username and password in a handy place—we will need to enter these later on your email client configuration.
- Finally, hit Add SMTP User at the bottom of the form.
Now, we need to configure the Gmail client to send emails through SMTP2GO.
- Open Gmail Settings (gear icon) then select See all settings.
- Go to the tab called Accounts and Import.
- Under Send mail as find the link to Add another email address.
- In the pop-up window, enter your name and your custom email address. Keep Treat as an alias checked. Click Next Step.
- Enter the following SMTP server information, then click Add Account.
- Server: mail.smtp2go.com
- Port: 587
- Username and password, as configured with SMTP2GO.
- Keep Secured connection using TLS selected.
- Gmail will send a verification email to the custom address. Since we already have emails sent to this address redirected using Cloudflare, the validation email should show up on our Gmail inbox shortly.
- Click the link in the email or enter the code included in the email.
What about other email clients besides Gmail?
It is possible to follow the steps under Setup Email Forwarding for Incoming Email even if our inbox is not in Gmail, for example, Yahoo Mail! However, other email clients typically do not have an option to send email from a different FROM ADDRESS.
Outlook.com is an exception. You can send mail using your custom domain address by following these steps:
- From the Outlook.com web client, click on Settings (gear icon) then select Forwarding and IMAP.
- Under Email aliases, select Manage or choose a primary alias.
- After re-authenticating, we should see a configuration page for our Microsoft account. Under Account aliases click on Add email.
- Select the option to Add an existing email address as a Microsoft account alias and enter the custom email address in the text field. Then hit Add alias.
- A validation email will be sent to the custom domain address. If you followed the steps in Setup Email Forwarding for Incoming Email, the validation email should arrive on your Outlook.com inbox.
- Tap the link on the email to complete the process.
After this, you should be set to send email from your custom domain. When composing a new email, you should see a From: drop-down, next to the Send button. Here you can choose the email you want to send the email from.
There is one big downside to this approach, however. Since Outlook.com is not sending emails through a SMTP server that can validate ownership of our new domain, recipients will most likely see a note next to our address, stating that the email was sent via Outlook.com:

This is a security feature implemented by many email clients to prevent spoofing. Unfortunately there is no workaround with Outlook.com since it does not allow sending email through a different SMTP server.
In contrast, when we configure SMTP2GO, AWS SES, or other SMTP server provider to validate our domain (as we did earlier in this guide), the SMTP server will use DKIM (DomainKeys Identified Mail) to sign our outgoing emails. This signature is used by the recipient's inbox (Gmail, Outlook, Yahoo, etc.) to verify that the email claiming to be from our domain was genuinely sent by an authorized sender.
What's next?
Now you have a custom email address setup for personal use. What else can you do with the configuration that you have put in place as part of this guide? Here's a few ideas to get you started:
- If you are a self-hoster (like me!) you can use it to configure your hosted services to send mail from personalized email addresses, like
[email protected]. Since you have already validated your domain with SMTP2GO, you don't need any additional configuration. - You can configure incoming email routing for additional addresses to separate personal email from newsletters, online services, etc. This helps keep your personal email address private, while still receiving all email on a single Gmail inbox.