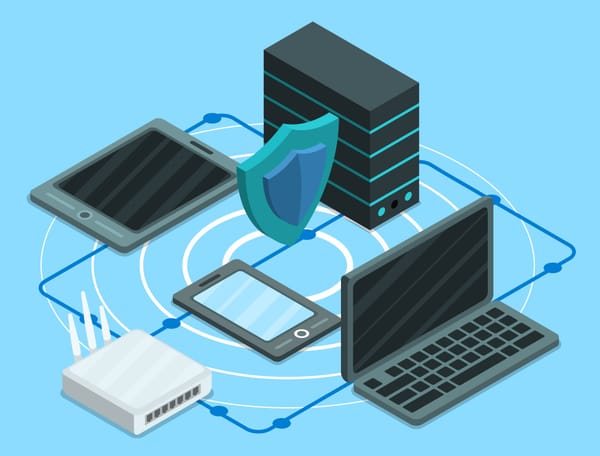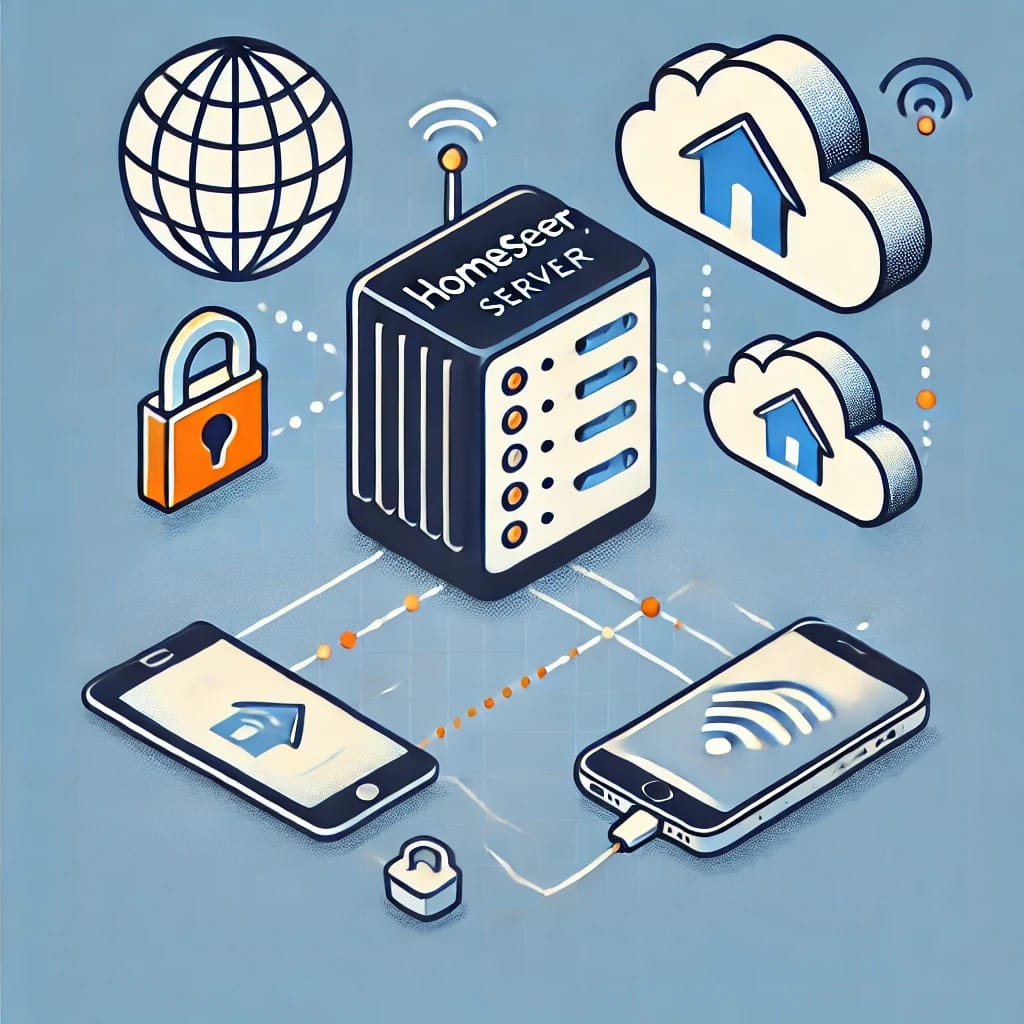
MyHomeSeer (MyHS) is a great service for many HomeSeer users, offering convenience and additional features like cloud backups and camera recording storage. However, for those seeking lower latency, more control, or the flexibility to expand their setup—such as enabling real-time status updates via ASCII or exposing other local services—direct access can be a powerful alternative. In this guide, I’ll show you how to securely access your HomeSeer server from anywhere using Cloudflare Tunnels, a free and easy-to-configure solution. We’ll also explore Tailscale, a modern VPN that creates a private, secure network between your devices for advanced use cases. Whether you’re optimizing performance or preparing for future smart home expansions, these tools can open up exciting possibilities.
Prerequisites: What You'll Need
The content in this guide starts from the assumption that you have a HomeSeer server setup and running at home. Although you can follow along and adapt the following sections to a different type of server, for example, Home Assistant. Regardless of what software is running on your Smart Home hub, the server should have an Internet connection available.
I recommend getting a personal domain name, which you will then use to connect to your server, for example: hs.myhome.net. If you do not have a domain name already, you can get one with Cloudflare. Many domains can be purchased for less than $10usd a year.
Having your own domain makes the address to your server more memorable and it also gives you more flexibility for future projects (e.g. create email addresses under your domain). However, it isn't strictly required to have a domain in order to follow the rest of this guide. You may get started with one of the 2LD (second level domains) offered by Cloudflare and Tailscale. Later down the road you can purchase your own and change your configuration accordingly.
What are Cloudflare Tunnels?
Cloudflare Tunnels provide a secure and straightforward way to expose local services—like your HomeSeer server—to the internet without needing to open ports on your router or manage complex firewall configurations. A Cloudflare Tunnel acts as a bridge between your local network and Cloudflare’s network, encrypting traffic end-to-end and hiding your internal services behind Cloudflare’s robust security infrastructure. With Cloudflare Tunnels, there’s no need for traditional port forwarding or exposing your public IP address, significantly reducing the risk of cyberattacks.
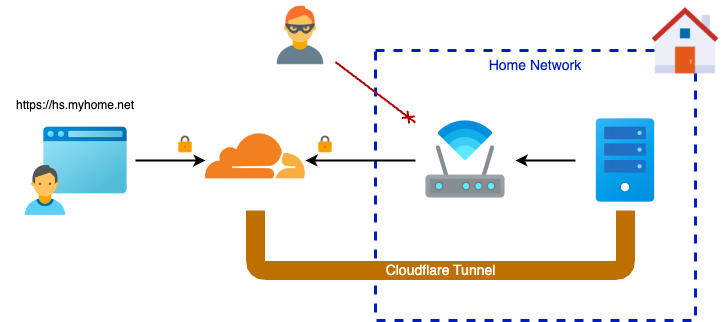
Once the tunnel is set up, Cloudflare assigns a unique *.cfargotunnel.com subdomain, which serves as the public address for accessing your service. If you have your own custom domain, for example myhome.net you can create a mapping to a subdomain, for example hs.myhome.net. Beyond simple access, Cloudflare’s network provides powerful additional features, such as built-in DDoS protection, encrypted traffic routing, and access control policies. This makes Cloudflare Tunnels an attractive solution for anyone looking to securely access home servers or services like HomeSeer without compromising on security or ease of use.
Benefits of Cloudflare Tunnels
- No need for port forwarding. With Cloudflare Tunnels, you don’t have to open ports on your router or expose your public IP address. This greatly reduces the risk of attacks like DDoS and unauthorized access while simplifying your network configuration.
- No public IP required. You don’t need a static or public IP address for your server. This is especially useful for home networks with dynamic IP addresses assigned by ISPs.
- Simple setup of traffic encryption. Cloudflare Tunnels expose your service via HTTPS (encrypted) traffic. However, you don't need to setup and maintain SSL certificates. Additionally, the service connected to the tunnel (e.g. HomeSeer) may use HTTP (unencrypted) traffic. Although a solution using end-to-end encryption would be recommended, you can have Cloudflare terminate HTTPS traffic at the edge and have traffic between Cloudflare and your server run unencrypted (simpler, though less secure).
- Free to use (in most cases). For personal use or small projects, Cloudflare Tunnels are available at no cost under Cloudflare’s free plan. This makes it an affordable alternative to paid proxy or VPN services for remote access.
- Built-in DDoS protection. Since traffic is routed through Cloudflare’s global network, it benefits from automatic Distributed Denial of Service (DDoS) protection. This makes it much harder for attackers to overwhelm your server.
Step-by-Step: Setting up a Cloudflare Tunnel
The following steps will help you get a Cloudflare Tunnel to your server up and running. These instructions are not specific to a server running HomeSeer - you may use this approach for a server running any other self-hosted application (e.g. Home Assistant, NextCloud, etc.).
Step 1: Create a Cloudflare account
If you do not already have an account with Cloudflare, you can set up a new account in just a couple minutes. Head out to their sign-up page and follow the instructions to setup your new account. It really only takes a couple seconds. You do not need any payment methods to do this.
Step 2: Register a new or existing domain
If you do not already have an existing domain, you can register a new domain to use for your HomeSeer service. You can do this from your Cloudflare dashboard.

If you already have an existing domain for your home network you can transfer its DNS records to Cloudflare.
Step 4: Create a new Cloudflare Tunnel
- Go to the Zero Trust section of your Cloudflare dashboard. You will find a link on the right-side menu of the dashboard.
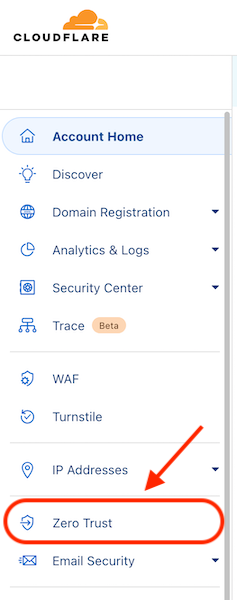
- On the dashboard for Zero Trust, in the right-side menu, find and expand the section for Networks and then select Tunnels. On the right-hand panel select Create a tunnel.

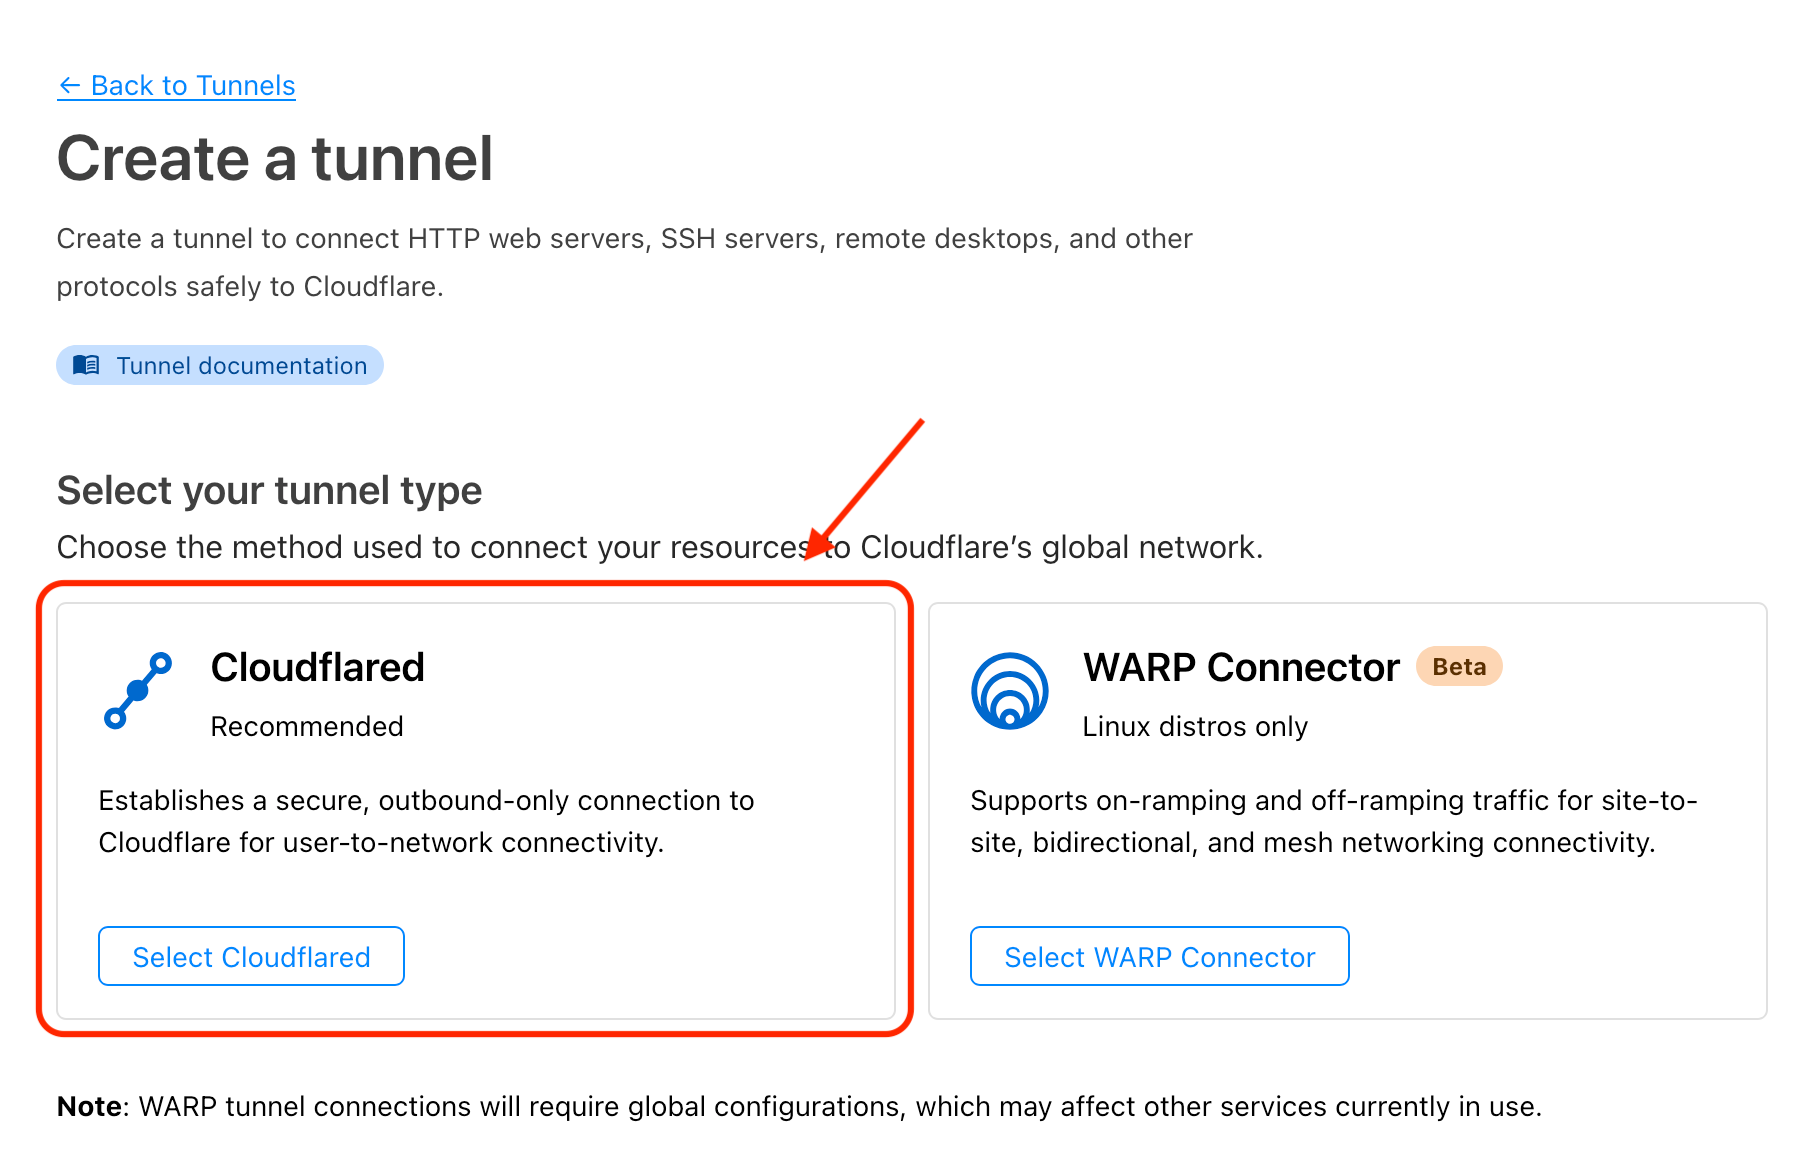
- When given an option for a tunnel type, select Cloudflared.
- In the section that follows, enter a name for your tunnel and hit Save tunnel.
- In the section that follows, select the appropriate operating system and architecture of your server. Then follow the instructions on screen to install and configure the Cloudflare Tunnel client.
- Once the client is installed and configured, it should appear in the bottom section of the screen back in the Cloudflare Tunnel configuration site. Select it and hit Next.
Step 5: Configure a public hostname for HomeSeer
If you just followed the steps above to create a new Cloudflare Tunnel, you will be at the screen to setup a Public Hostname for your new tunnel. If you are trying to configure a new hostname, you can get back to this screen by opening your Cloudflare dashboard, navigating to the Zero Trust section, and selecting Tunnels under Network. Then tap on the name of your tunnel to edit its configuration and switch to the Public Hostname tab and select Add a public hostname.
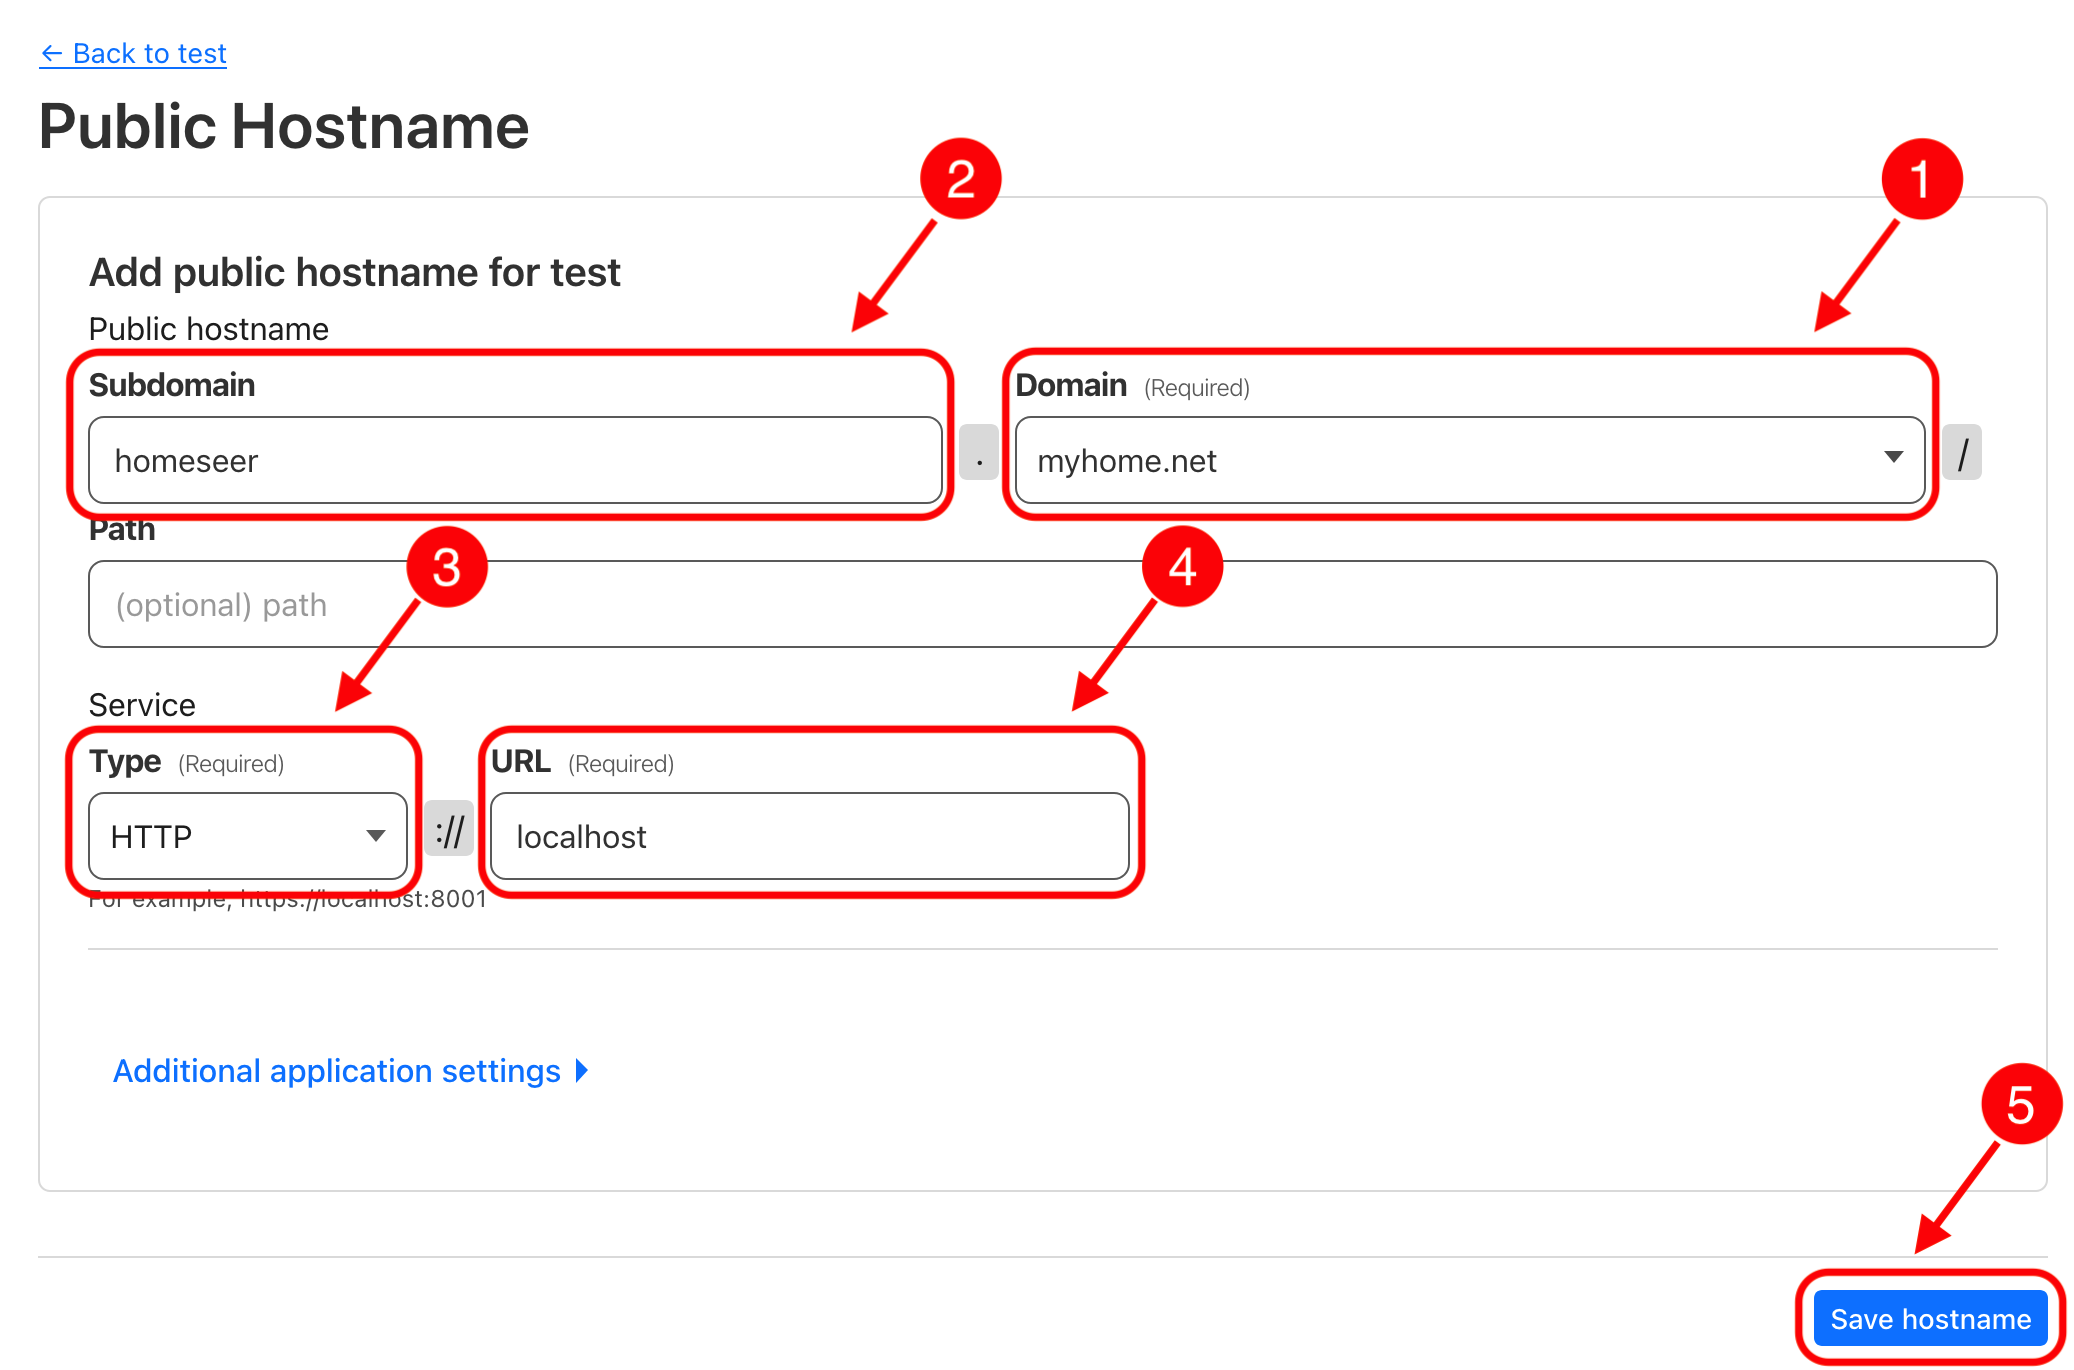
On the screen to configure your public hostname:
- Select the domain you wish to use for your service. It must be a domain that has its DNS records hosted in Cloudflare.
- Enter a subdomain that you wish to use to access your service. For example
hsorhomeseer. - Select the service type. If you have installed HomeSeer using its default configuration, use
HTTP. If you've setup HomeSeer to support SSL, you may chooseHTTPS. - Select the address that the tunnel client will need to access in order to reach your HomeSeer service. In our example, since we are installing the Cloudflare Tunnel client on the same machine that is running HomeSeer, we can simply enter
localhost. If you are running HomeSeer on a port other than80you can enter it here as well, for example:localhost:8080. - Finally, tap on Save hostname
Step 6: Test and secure access
At this stage, you should be able to access your HomeSeer server by going to the site you have configured in the previous step. For example, https://homeseer.myhome.net This address will also work for applications that access HomeSeer via http besides web browsers. For example, you may access your server via the Cloudflare Tunnel by using the same address in HSBuddy.
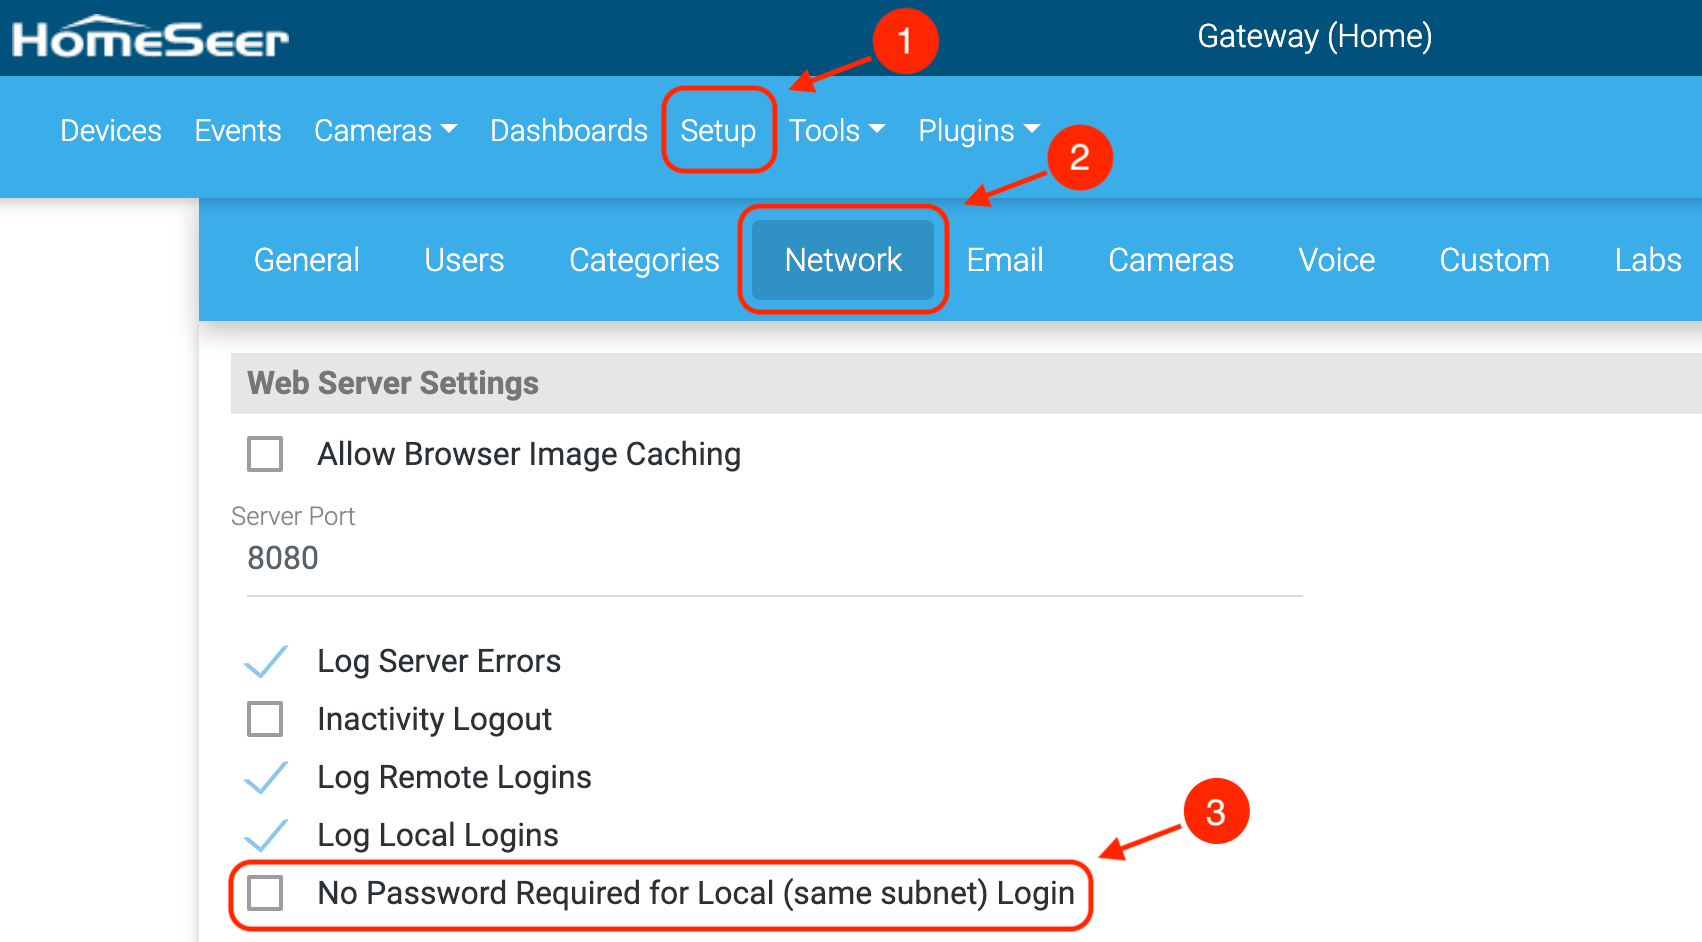
Because the Cloudflare Tunnel client and your HomeSeer service are both likely running on the same network (even on the same machine), you will want to make sure that HomeSeer requires user authentication, otherwise your server would be accessible to anyone that knows the address of your Cloudflare Tunnel.
You can do this from the HomeSeer web console by following these steps:
- Go to the Setup section on the top navigation bar.
- Select the Network tab.
- Make sure that the checkbox is not checked for No password Required for Local Login, as in the the screenshot below.
- Hit Save at the bottom of the page.
If you are using a reverse proxy such as nginx, Traefik, or other, you may want to configure basic authentication on the proxy software in place of, or in addition to, the access control in HomeSeer. I will cover how to setup and configure a reverse proxy in a separate post.
What is Tailscale?
Setting up and configuring Tailscale to access your server is an advanced topic and is only required if you would like to enforce additional security beyond basic authentication. This may come at the expense of additional complexity and/or reduced flexibility of your configuration.
Tailscale is a peer-to-peer virtual private network (VPN) solution that allows you to create a secure, private network between your devices—no matter where they are. Unlike traditional VPNs, which require complex setup and dedicated servers, Tailscale is built on top of the WireGuard protocol and works seamlessly by connecting devices directly to each other using encrypted tunnels. This peer-to-peer architecture minimizes latency and provides fast, secure access without the need for manual firewall or NAT configuration.
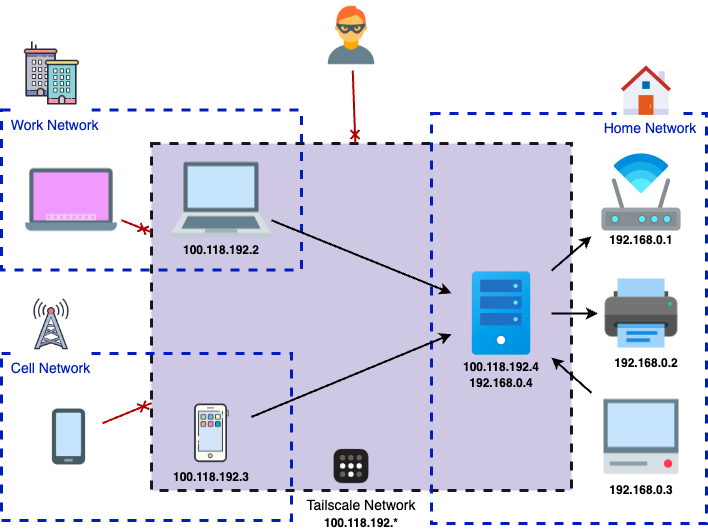
One of Tailscale’s greatest strengths is its simplicity. Once installed, devices automatically join a private network and can communicate with each other using a consistent internal IP address. It also offers advanced features like MagicDNS, which provides human-readable names for your devices, and ACLs (Access Control Lists) for fine-grained permission control. Whether you’re accessing your HomeSeer server, managing other smart home services, or remotely controlling a NAS, Tailscale makes secure access as easy as logging in with your existing identity provider (Google, Microsoft, GitHub, etc.).
Security and privacy first
Tailscale focuses heavily on security and privacy. All traffic between devices is encrypted using WireGuard, ensuring that even if your internet connection is compromised, your data stays protected. Because it uses a decentralized architecture, your traffic doesn’t pass through any centralized servers (except for authentication and coordination), giving you greater privacy and control. This makes Tailscale ideal for advanced use cases where security and reliability are critical—especially when managing smart home servers like HomeSeer, self-hosted services, or sensitive data.
Performance and compatibility
In order to join and remain in your Tailscale network, each device in the network must install and run the Tailscale client. Besides installing Tailscale on your home server, for which you will find versions of the client available for Windows, Mac and Linux, you will also need to install Tailscale on your mobile devices. Tailscale has clients available for iOS and Android. In order to access your server from these devices, the client will need to be running and connected to your Tailscale network. The following are some important points to keep in mind:
- Tailscale is more efficient compared to traditional VPNs. Tailscale is optimized for low power consumption and only encrypts traffic when needed. Unlike traditional VPNs that keep an active tunnel open at all times, Tailscale establishes connections only when required, reducing CPU and battery drain.
- Tailscale provides faster encryption with WireGuard, which is extremely lightweight and fast. There is no noticeable impact on browsing speed or network latency for most use cases.
- Add an exit node for increased protection. Tailscale lets you designate one or more trusted devices in your network as exit nodes (like your home server). You can then configure other devices to route all traffic through one of these exit nodes for added privacy and security.
Advanced guide: Secure access using Tailscale
The following steps will help you setup a Tailscale network with server running HomeSeer in it. Any additional devices you add to the network will be able to access your server securely without having to map any ports on your router or expose your home's public IP address.
Step 1: Create a Tailscale account
Creating a new account with Tailscale is quick, just head to their sign-up page and follow the instructions. One thing you will notice right away is that, rather than creating a new username/password, Tailscale will ask to authenticate you using an identity provider such as Google, Microsoft, Github, or Apple. There is a way to use a custom OIDC provider (e.g. AWS Cognito), including one self-hosted by you (e.g. Authelia). I will explain how to do this in a future article, however, that is a more advanced setup and not necessary if you just want to get up and running with Tailscale.
Step 2: Connect your server to Tailscale
Once you reach your Tailscale administration console, you can proceed to add the server running HomeSeer to your Tailscale network. Start the process by hitting the Add device button.
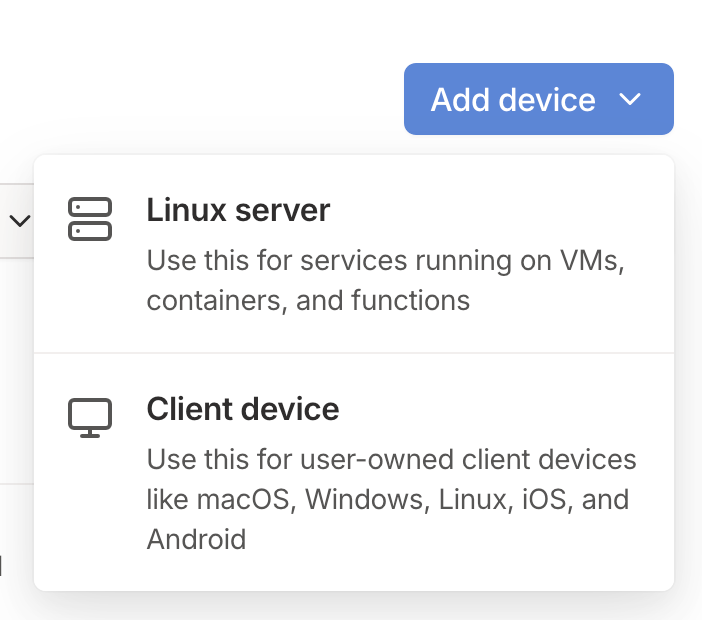
Installing as a client device
If your server is hosted on conventional hardware, such as a HomeTroller, or a machine you set up on your own, select Client device. Then, follow the instructions based on the operating system running on your server.
Setting up your connection with this option will require authentication with Tailscale using a web browser from the device being added to your network. This is possible to do even if you are remotely logging into a terminal on your server (e.g. using SSH), as long as you can click on the link that is printed to the console and open it on a web browser from your local host.
Installing as a Linux server
You should not require to use this option except for very rare cases when you need to be able to setup Tailscale by entering a single command on the terminal. This could be the case if your server is running on some form of headless Linux-based setup.
If you choose this option, in the configuration screen that follows, you can leave all options unchecked (these are for more advanced use-cases which you can enable at a later time if needed). At the bottom of the page, hit the Generate install script button which will print a command you will need to run from a terminal on your server (i.e. from an SSH session). Once that command completes, your server will be connected to your network.
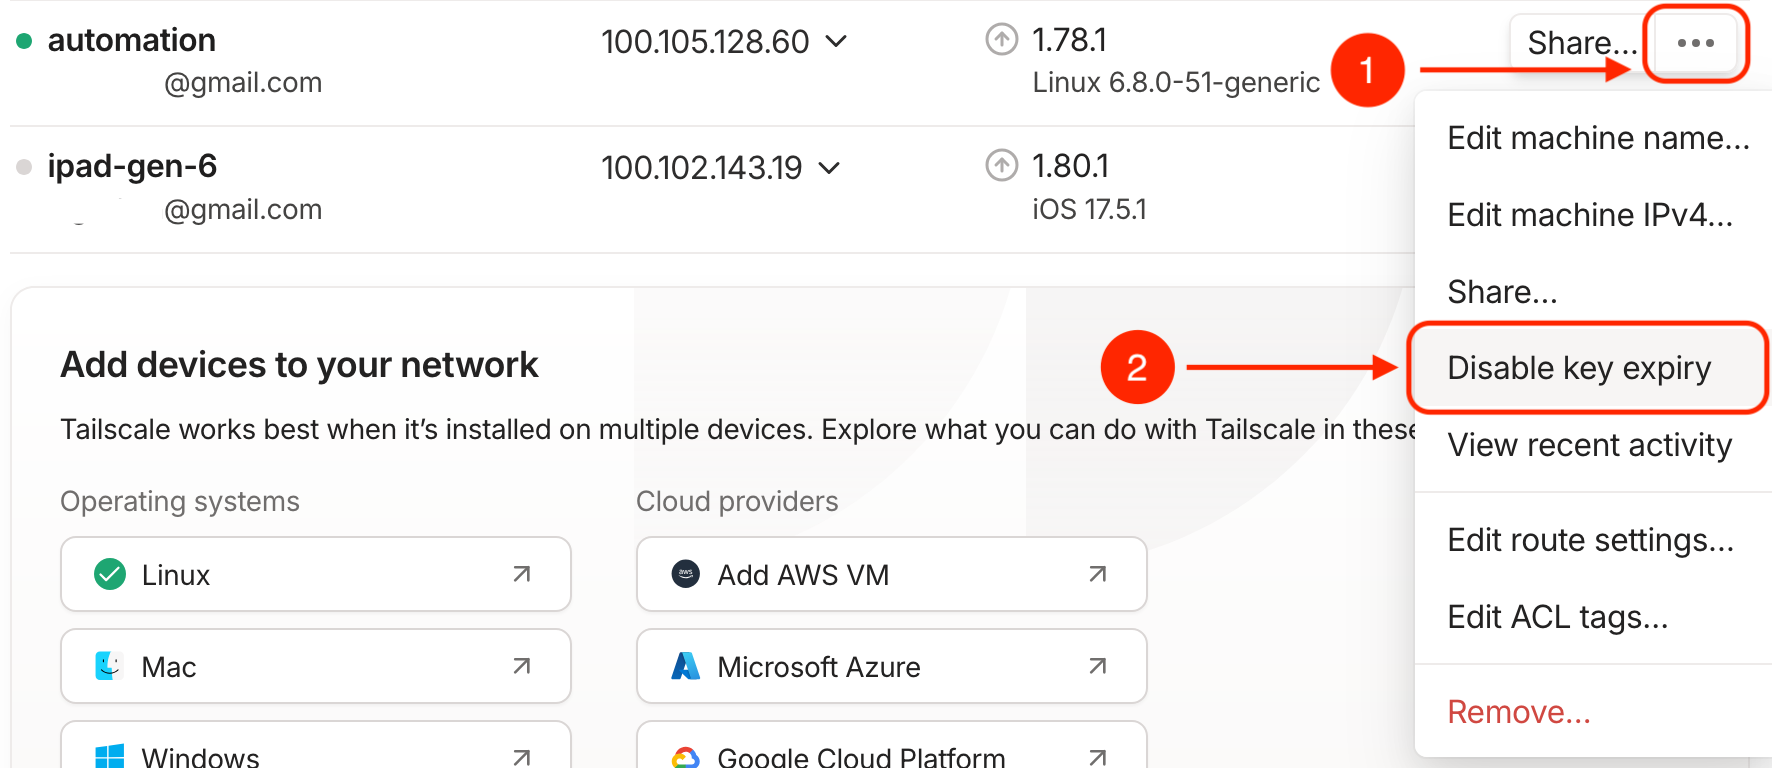
Step 3: Disable key expiry on your server
By default, Tailscale requires that devices connected to your network re-authenticate every so often. This is a good security practice for devices which may be lost or no longer in use. However, in the case of a server, it may be more convenient to disable this requirement. You can do this from your Tailscale administration console:
- Find the entry for your HomeSeer server in the list.
- Hit the right-side menu and select Disable key expiry.
Step 4: Install Tailscale on other client devices
Once your server is part of your Tailscale network, you need to also add and connect to your network any clients that you want to be able to access your server. For example, this could be a laptop that you want to use to browse the HomeSeer web UI. Or it could be a phone or tablet running HSBuddy.
To include additional clients to your Tailscale network, head back to your Tailscale administration console and hit the Add device button again, then select Client device. Follow the instructions based on your device type and operating system.
Step 5: Connect to your server
At this point, you should be able to connect to your home server from any device that has Tailscale installed and is also connected to your network, regardless of whether you are connected via your cellphone provider, the WiFi at your workplace, airport, etc. or any other method.
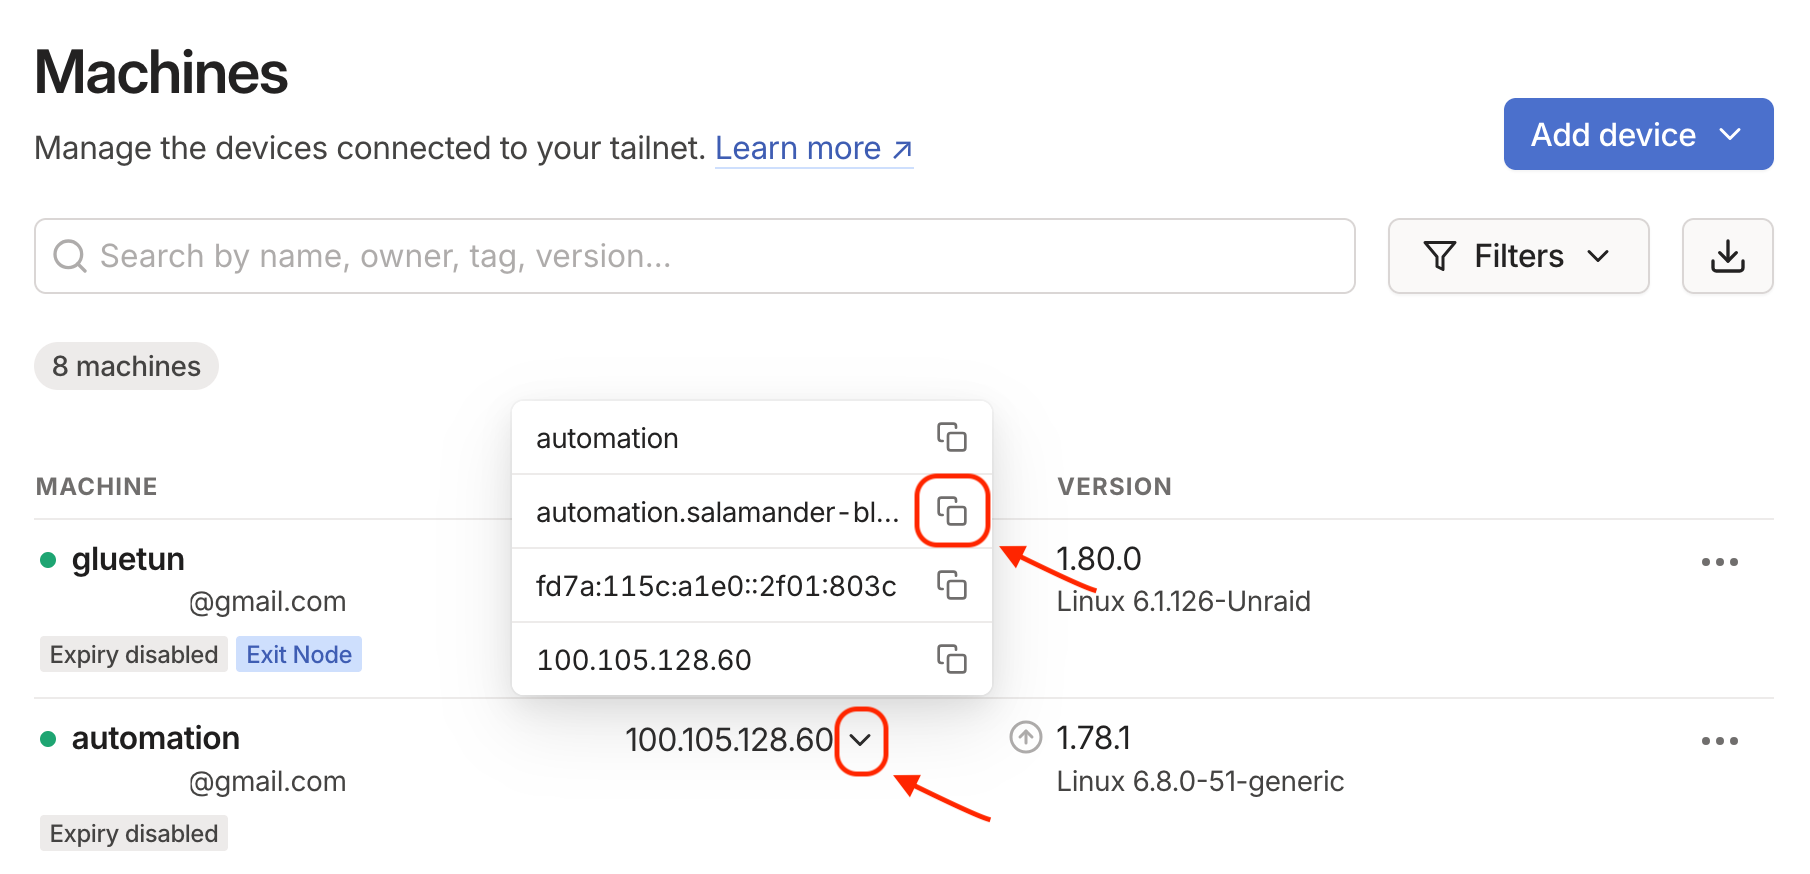
To connect, you will need to know your server address within the Tailscale network. This is the address you should use in your web browser, for example. Tailscale provides your connected devices with a friendly domain name using a predetermined second-level domain (2LD). In order to reveal and copy your server's address, head back to your Tailscale administration console and expand the context menu next to the server IP address. It will reveal your server name and friendly DNS (as well as IPv6 and IPv4 addresses).
Which option is right for you?
Both Cloudflare Tunnels and Tailscale provide secure remote access to your HomeSeer server, but they serve different purposes and come with their own advantages.
Cloudflare Tunnels may be a better option if:
- You want to access your HomeSeer server from any device without installing any additional software.
- You are satisfied with the security features offered by Cloudflare, such as built-in DDoS protection and HTTPS encryption, and you do not need the additional protection of running your HomeSeer traffic through a WireGuard tunnel.
- You only require HTTP/S access to HomeSeer and possibly a few other web-based services running on the same server.
Tailscale may be a better option if:
- You need full, private access to all your home network devices—not just the HomeSeer web interface.
- You require access to non-HTTP services running on your server, such as connecting to HomeSeer's ASCII or HSTouch ports.
- You don't want any services to be exposed to the internet at all.
Is it possible to use both?
Yes. There are some advanced scenarios that may benefit from combining both solutions, for example:
- You may use Cloudflare Tunnels to provide access to HomeSeer's web-based GUI. This also provides internet access to its JSON API which is used by applications like HSBuddy.
- Additionally, you can use Tailscale for secure access to other services running on your server. For example, when you need to perform administrative operations on your server, you can connect to Tailscale from a laptop or tablet and then use an SSH client to open a remote terminal console. I recommend Termius, a great SSH client that you can run from virtually any device.
What's next?
So you've configured remote access for your server using either Cloudflare Tunnels or Tailscale. What are the next improvements you can make to your self-hosting setup? Here are a few ideas—we will explore some of these in future tutorials:
- Setup a reverse proxy (nginx or Traefik) and route to multiple services running on your home network from a single entry point.
- Use an authentication service (Authelia) to provide single sign-on (SSO) for multiple services, including HomeSeer.
- Configure real-time monitoring of your HomeSeer server and all of your home automation devices with Prometheus and Grafana.