HomeSeer is a feature-rich home automation system that provides users with extensive control over their smart home devices. Unlike many consumer-focused platforms, HomeSeer runs on a local server in your own home, offering reliability, flexibility, and privacy. This guide introduces the key functionalities that beginners need to know to start using HomeSeer effectively.
First, we’ll look at how to navigate the HomeSeer web interface on both desktop and mobile, allowing you to monitor and control devices with ease. We’ll then dive into event-based automation, which lets you create custom rules and actions without needing to write code. Simple examples, like turning on lights at sunset or sending notifications when motion is detected, will help illustrate how easy it is to automate your home.
Next, we’ll explore HomeSeer’s ability to integrate with cameras for live viewing and event-triggered recording. We’ll also discuss the power of plug-ins, which significantly expand the system’s capabilities by adding support for new devices, and many third-party integrations.
Finally, we’ll cover essential troubleshooting tips, such as checking system log, to ensure HomeSeer runs smoothly. For those interested in more advanced customization, we’ll introduce the concept of scripting with C#, which enables users to create highly sophisticated automation. By the end of this post, you’ll have a solid understanding of HomeSeer’s fundamentals and be ready to explore its full potential.
Introduction
Who Should Read This Article
This guide is for anyone exploring options for a home automation hub. Maybe you’ve started with a few smart devices from a single brand and are now looking to expand beyond their proprietary app. Perhaps you want to integrate devices from different manufacturers that don’t natively communicate with each other. Or you might already own a consumer-grade hub but are considering a self-hosted solution for better privacy, reliability, and control.
Whatever your situation, if you’re curious about what HomeSeer can offer and how it can enhance your smart home experience, this guide will help you understand its capabilities and determine if it’s the right fit for you.
My Own Experience With Home Automation
My journey into home automation started in 2015 when I decided to make all the lights in my home “smart.” At the time, Philips Hue was already a popular choice, but most of my light fixtures required multiple bulbs, and I had recently upgraded them to LEDs. Replacing them all again didn’t seem like the best solution. That’s when I started exploring alternatives and discovered smart switches—specifically, GE’s smart switches. Unlike Philips Hue, these didn’t require replacing bulbs, but they also didn’t come with a built-in hub. That led me down the path of researching home automation hubs, which is how I stumbled upon HomeSeer 3 (now in its fourth iteration).
Since then, I’ve become a strong advocate for home automation using HomeSeer. After starting with smart switches, I gradually expanded my system with more devices, many of which are now part of dozens of automation routines. The best part is, most of these routines run entirely on their own—I only remember they exist when something stops working (which is rare).
Over the years, I’ve met many people who are curious about home automation but feel overwhelmed by the sheer number of options. Consumer-grade systems often offer too little control and are often locked into their own ecosystems, making it impossible to create routines that work across different brands. On the other hand, high-end solutions can feel too complex and require significant technical expertise. I believe HomeSeer strikes the perfect balance between ease of use and advanced customization. My goal with this guide is to help you gain the confidence to take the leap into home automation. If you’ve ever wanted a smarter, more autonomous home but weren’t sure where to start, I hope this article gives you the inspiration and practical knowledge to begin your journey.
The HomeSeer Interface
HomeSeer’s primary interface is a web-based portal designed for easy navigation. You can access it directly from a computer on the same network as your HomeSeer hub or remotely via MyHomeSeer, a cloud-based proxy service that includes a free tier for all users. If you prefer full control, you can also set up remote access using your own domain (e.g., homeseer.mydomain.com), allowing secure access from anywhere.
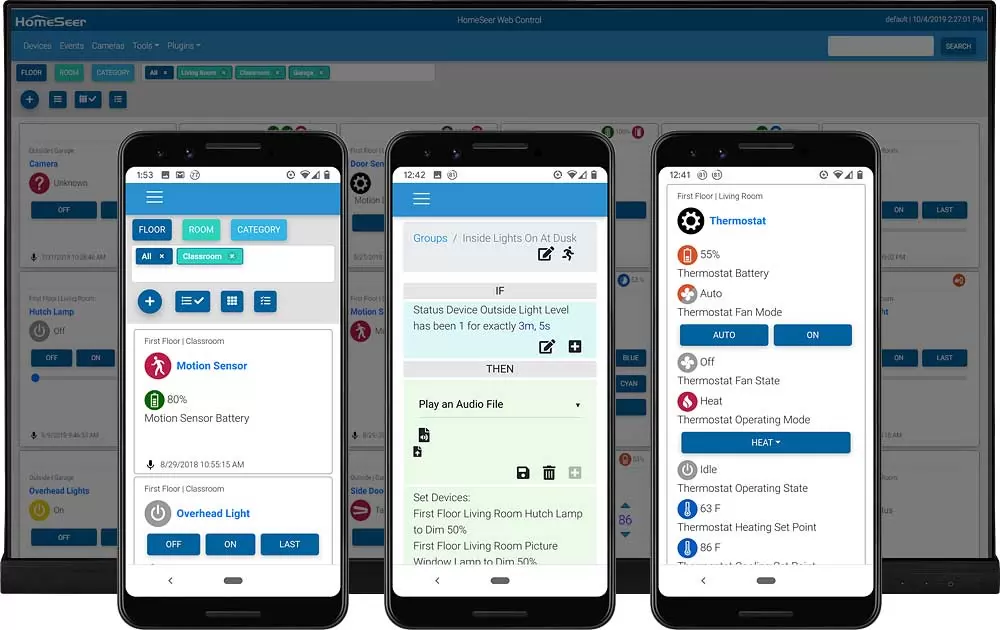
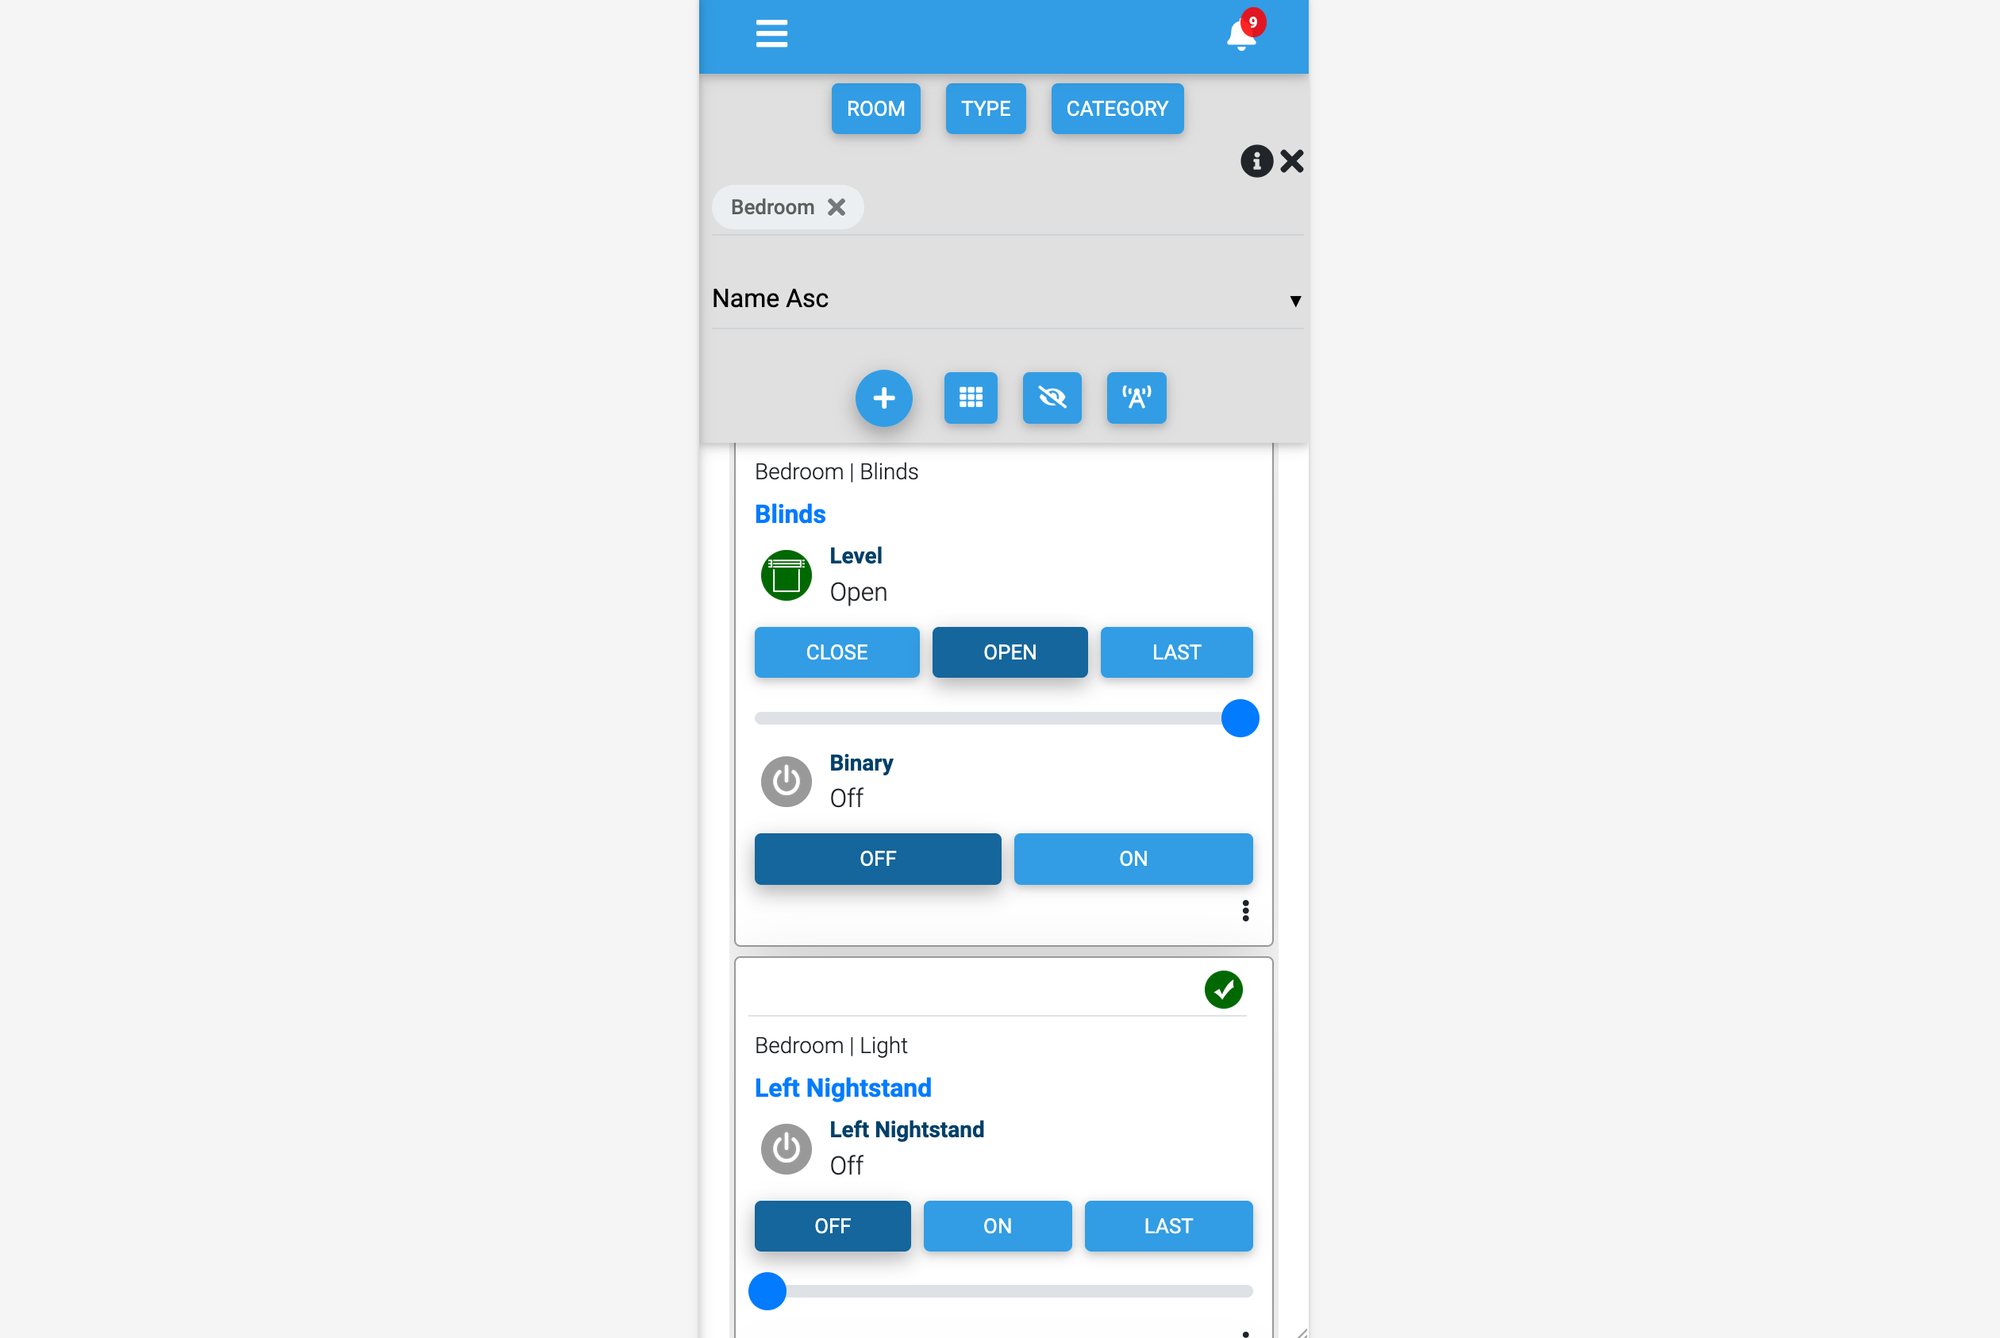
The web portal is fully responsive, meaning it adapts seamlessly to different screen sizes. Whether you’re using a desktop, tablet, or smartphone, the interface remains functional and easy to use.
The main navigation menu is organized into several key sections:

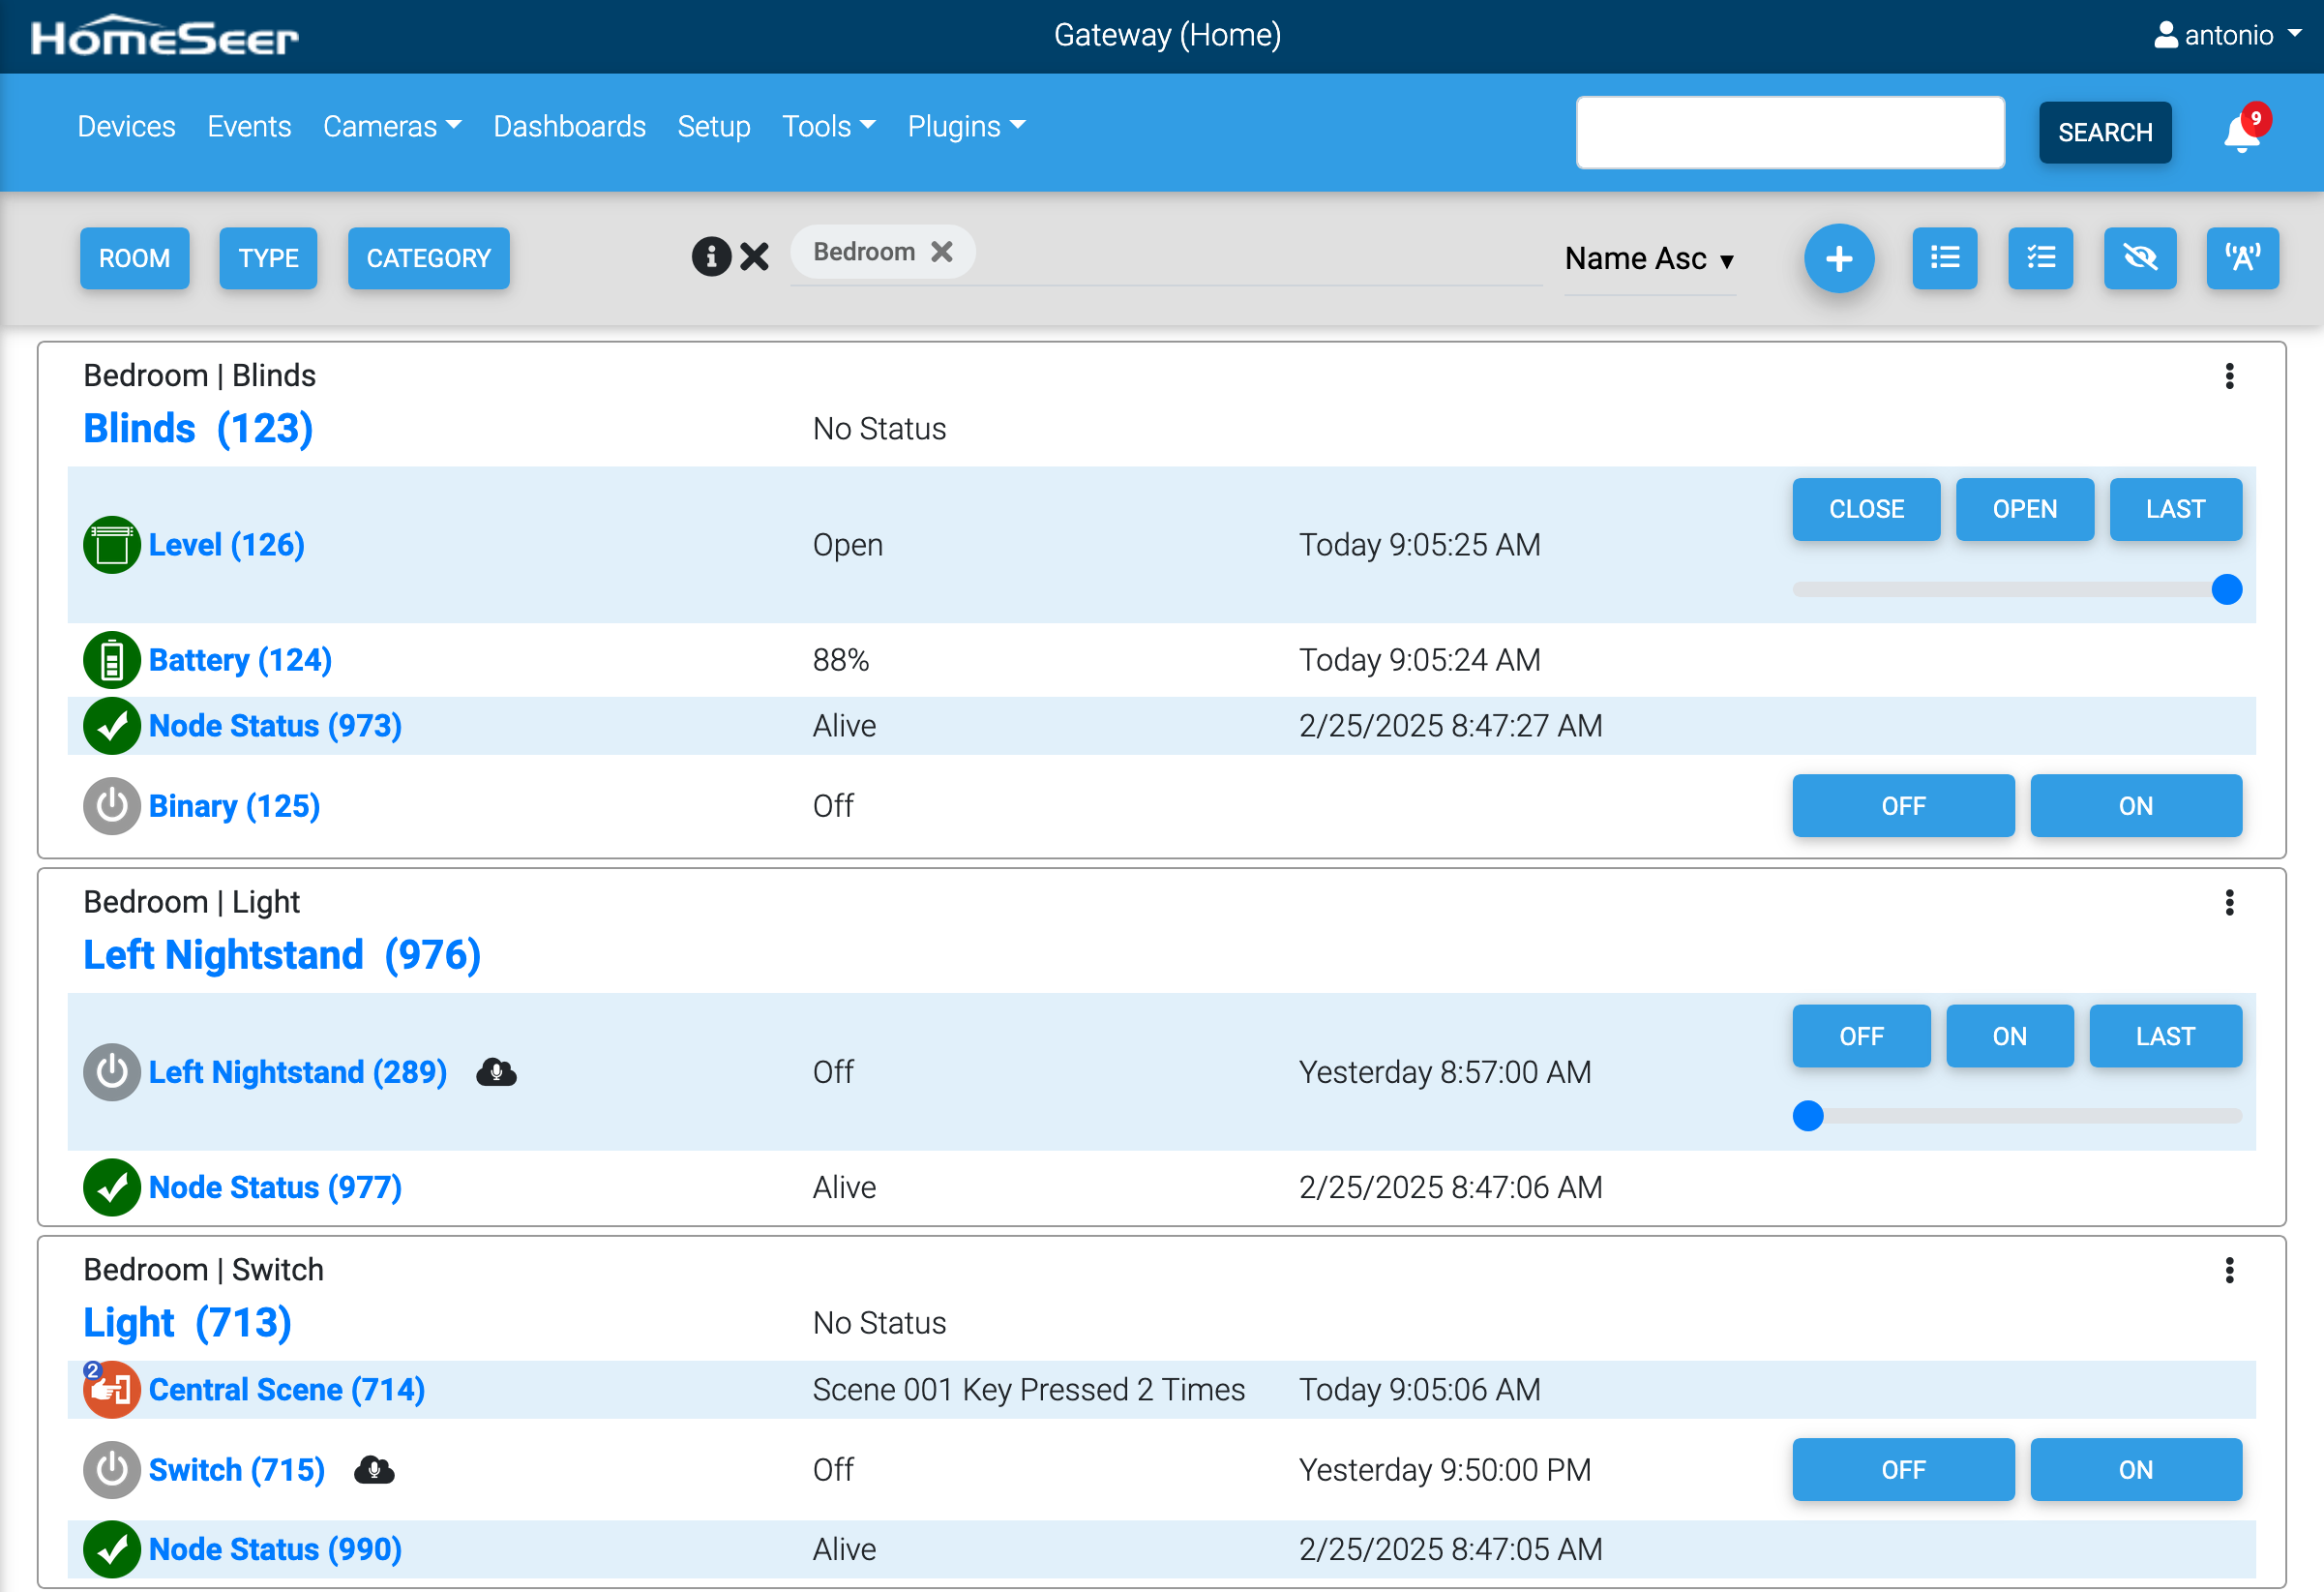
- Devices: View and manage all smart devices connected to HomeSeer. You can check their status, control them directly, and filter devices based on attributes like room, type, or technology (e.g., Z-Wave, Zigbee).
- Events: This is the heart of your automation system. Using an intuitive no-code editor, you can create and manage automation routines that define how devices interact with each other. We’ll explore this in more detail later.
- Cameras: View live feeds and recordings from any cameras connected to HomeSeer. This section allows you to monitor security footage directly from the interface.
- Dashboards: These are user-created views that can incorporate devices and cameras with flexible layout configurations.
- Setup: Configure system settings, manage users, and control access permissions for different users and devices.
- Tools: Access various administrative tools, including system logs, backup/restore options, and system diagnostics to troubleshoot issues efficiently.
- Plug-ins: Extend HomeSeer’s capabilities by managing and installing plug-ins. Plug-ins add support for additional smart home technologies, integrations, and advanced features. We’ll dive deeper into plug-ins in a later section.
Additionally, there is a full-text search option to quickly find a device, event, timer, etc. by any of its attributes.
Devices: Control and Management
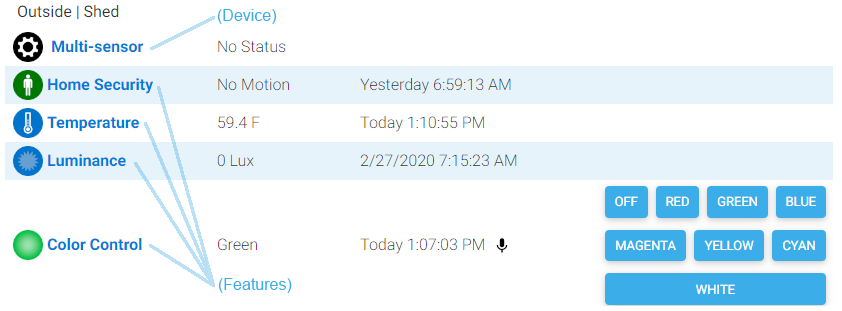
Devices in HomeSeer represent physical or virtual elements in your home—such as a lamp in the living room, a ceiling fan in the den, or a garage door. Each device is composed of one or more features, which correspond to specific observable and/or controllable aspects of the device.
For example, a smart light bulb may have a POWER feature with ON/OFF states, but if it supports dimming, it may also have an INTENSITY feature. Some bulbs even include a COLOR feature. On the other hand, sensors typically provide only observable data, without controllable features. For instance, a window sensor can report whether a window is OPEN or CLOSED, but you cannot change its state from HomeSeer.
How HomeSeer Communicates with Devices
Each device in HomeSeer is connected through a device interface, which is the medium and protocol used to discover and control the device. These interfaces are provided by plug-ins, which extend HomeSeer’s functionality.
- Z-Wave and Zigbee plug-ins allow HomeSeer to discover and control wireless devices that connect locally to your hub (without a 3rd party cloud).
- Cloud-based plug-ins enable communication with smart devices that rely on their own manufacturer services. For instance, the Ecobee plug-in allows HomeSeer to integrate with Ecobee thermostats by connecting to its cloud service.
Configuring Devices in HomeSeer
While the features and configuration of a device are primarily determined by the plug-in that manages its interface, HomeSeer allows extensive customization through its web portal.
From the Devices view, clicking on a device’s name takes you to its Device Settings page, where you can:
- Manage categories that a device belongs to. You can use categories to filter views of devices in the web portal.
- Rename the device and assign it to a specific location (e.g., Living Room, Kitchen).
- Enable voice control for Alexa or Google Assistant.
- Manage user permissions in multi-user households.
- Customize the device appearance on the web portal, such as choosing different status icons, control button text, and display formatting.
Effortless Automation: Events in HomeSeer
The HomeSeer web interface provides an easy way to view and control your smart home devices, but the true power of HomeSeer lies in its automation capabilities. By creating Events, you can make your devices work for you autonomously, responding to real-world conditions without manual intervention.
Understanding Events: Triggers and Actions
An Event in HomeSeer is essentially a rule that consists of one or more triggers (conditions that initiate the event) and actions (the tasks performed when the conditions are met). You can also nest conditions and actions to create more advanced logic.
For example: Imagine you want your kitchen blinds to close automatically 30 minutes before sunset. You also want the kitchen lights to turn on—but only if your home alarm is set to “Away.” In HomeSeer, you can create a single Event to handle this:
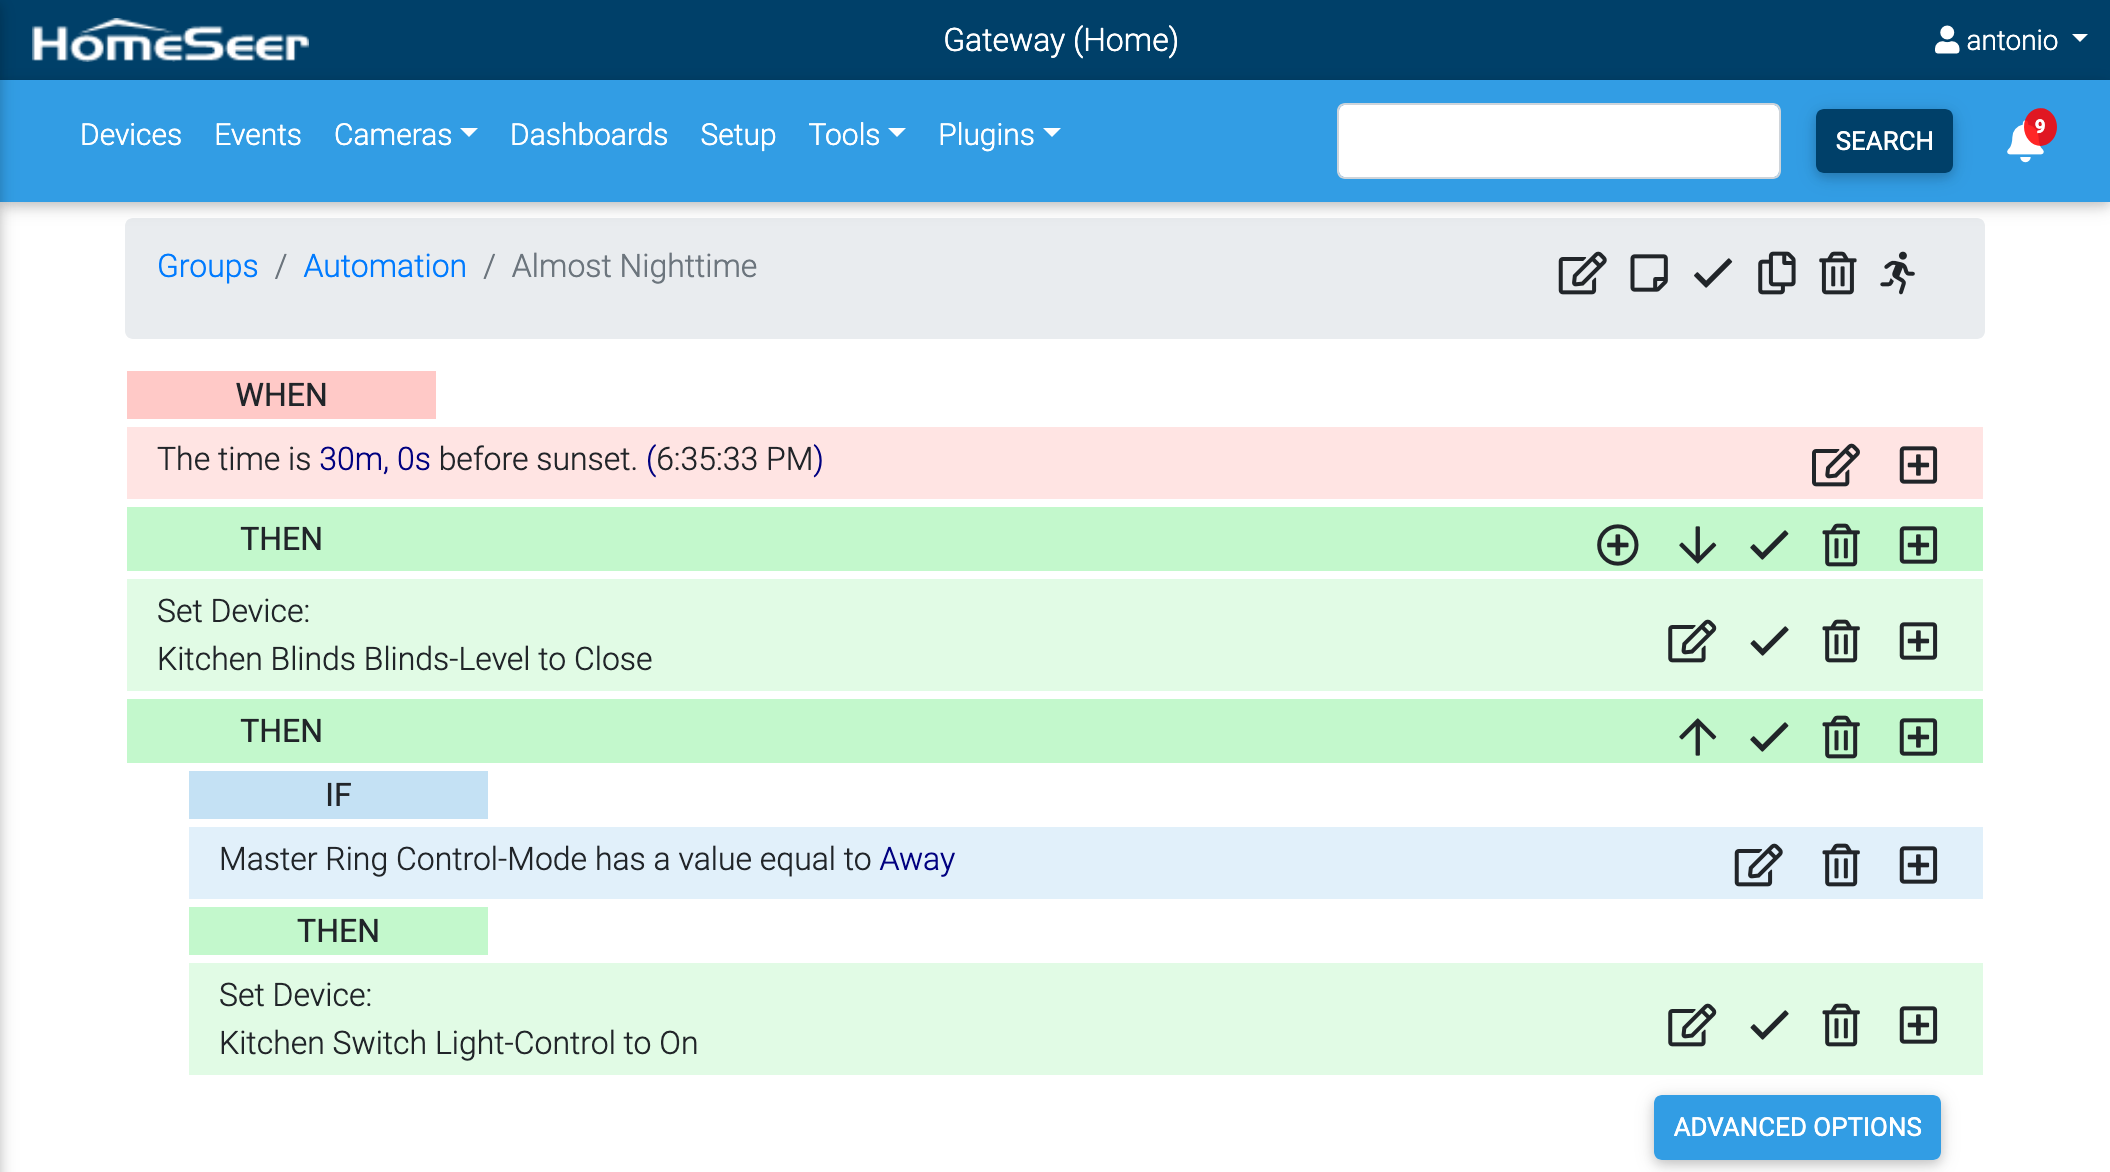
This entire automation can be set up using simple drop-down menus and text boxes—no coding required!
Extending Events with Plug-ins
Plug-ins enhance automation by introducing new triggers, conditions, and actions beyond standard device properties. For example, the HSBuddy plug-in lets you use your phone’s location as a trigger (e.g., “When I leave home…”) or send push notifications as an action.
Other plug-ins enable integrations with weather services, voice assistants, energy monitoring, and more—greatly expanding automation possibilities.
Advanced Event Controls
For even more flexibility, HomeSeer provides special controls to fine-tune Event behavior:
- Rate Limiting: Prevent an Event from running more than once within a set time period.
- Event Chaining: Enable, disable, or even cancel an event that is currently running from another event's actions.
- Event Group Conditions and Actions: Create sophisticated workflows that compose multiple events and adapt dynamically based on real-time conditions.
With these tools, you can create everything from simple automations to complex routines.
Cameras: Secure, Private, and Smart Monitoring
In recent years, security cameras have become more affordable while offering high-resolution video and advanced features such as motion-based recording, sound detection, facial recognition, and push notifications. Many popular brands sell cameras with impressive capabilities at low prices. However, a common downside is that these cameras often lock users into proprietary apps and cloud services, preventing third-party integrations.
This lack of openness raises serious concerns about data privacy and security—as users have little control over how their video feeds are processed or stored. Unfortunately, there have been multiple incidents where security camera footage was accessed improperly, highlighting the risks of relying on closed ecosystems.
HomeSeer’s Private and Secure Camera Integration
For privacy-conscious users, HomeSeer provides an alternative. Instead of streaming your video feeds to a third-party cloud, HomeSeer allows you to connect directly to your cameras, keeping your footage securely within your local network.
Through the HomeSeer web portal, you can:
- View live camera feeds in real time.
- Access saved recordings, which can be automatically created based on automation events.
- Integrate cameras with automation, triggering actions based on motion or other smart home conditions.
For example, you could create an Event that triggers when your garage motion sensor detects movement, automatically recording 15 seconds of footage from your garage camera. You could even add an action to send yourself an email with the video attachment, ensuring you stay informed of any unexpected activity.
Supported Cameras and Integrations
To integrate a security camera with HomeSeer, it must support RTSP (Real-Time Streaming Protocol). Fortunately, many popular brands, such as Reolink and Amcrest, offer RTSP-compatible cameras that can be easily added to HomeSeer.
Additionally, if you already use camera monitoring software like BlueIris or Sighthound Video, there are plug-ins available for HomeSeer that allow you to integrate those systems seamlessly. Even Ring cameras can be connected to HomeSeer through a plug-in—a solution I personally use and highly recommend.
With these integrations, HomeSeer ensures that you remain in control of your security footage, keeping your data private while still enjoying the convenience of automation and remote monitoring.
Plug-ins: Unlocking HomeSeer’s Full Potential
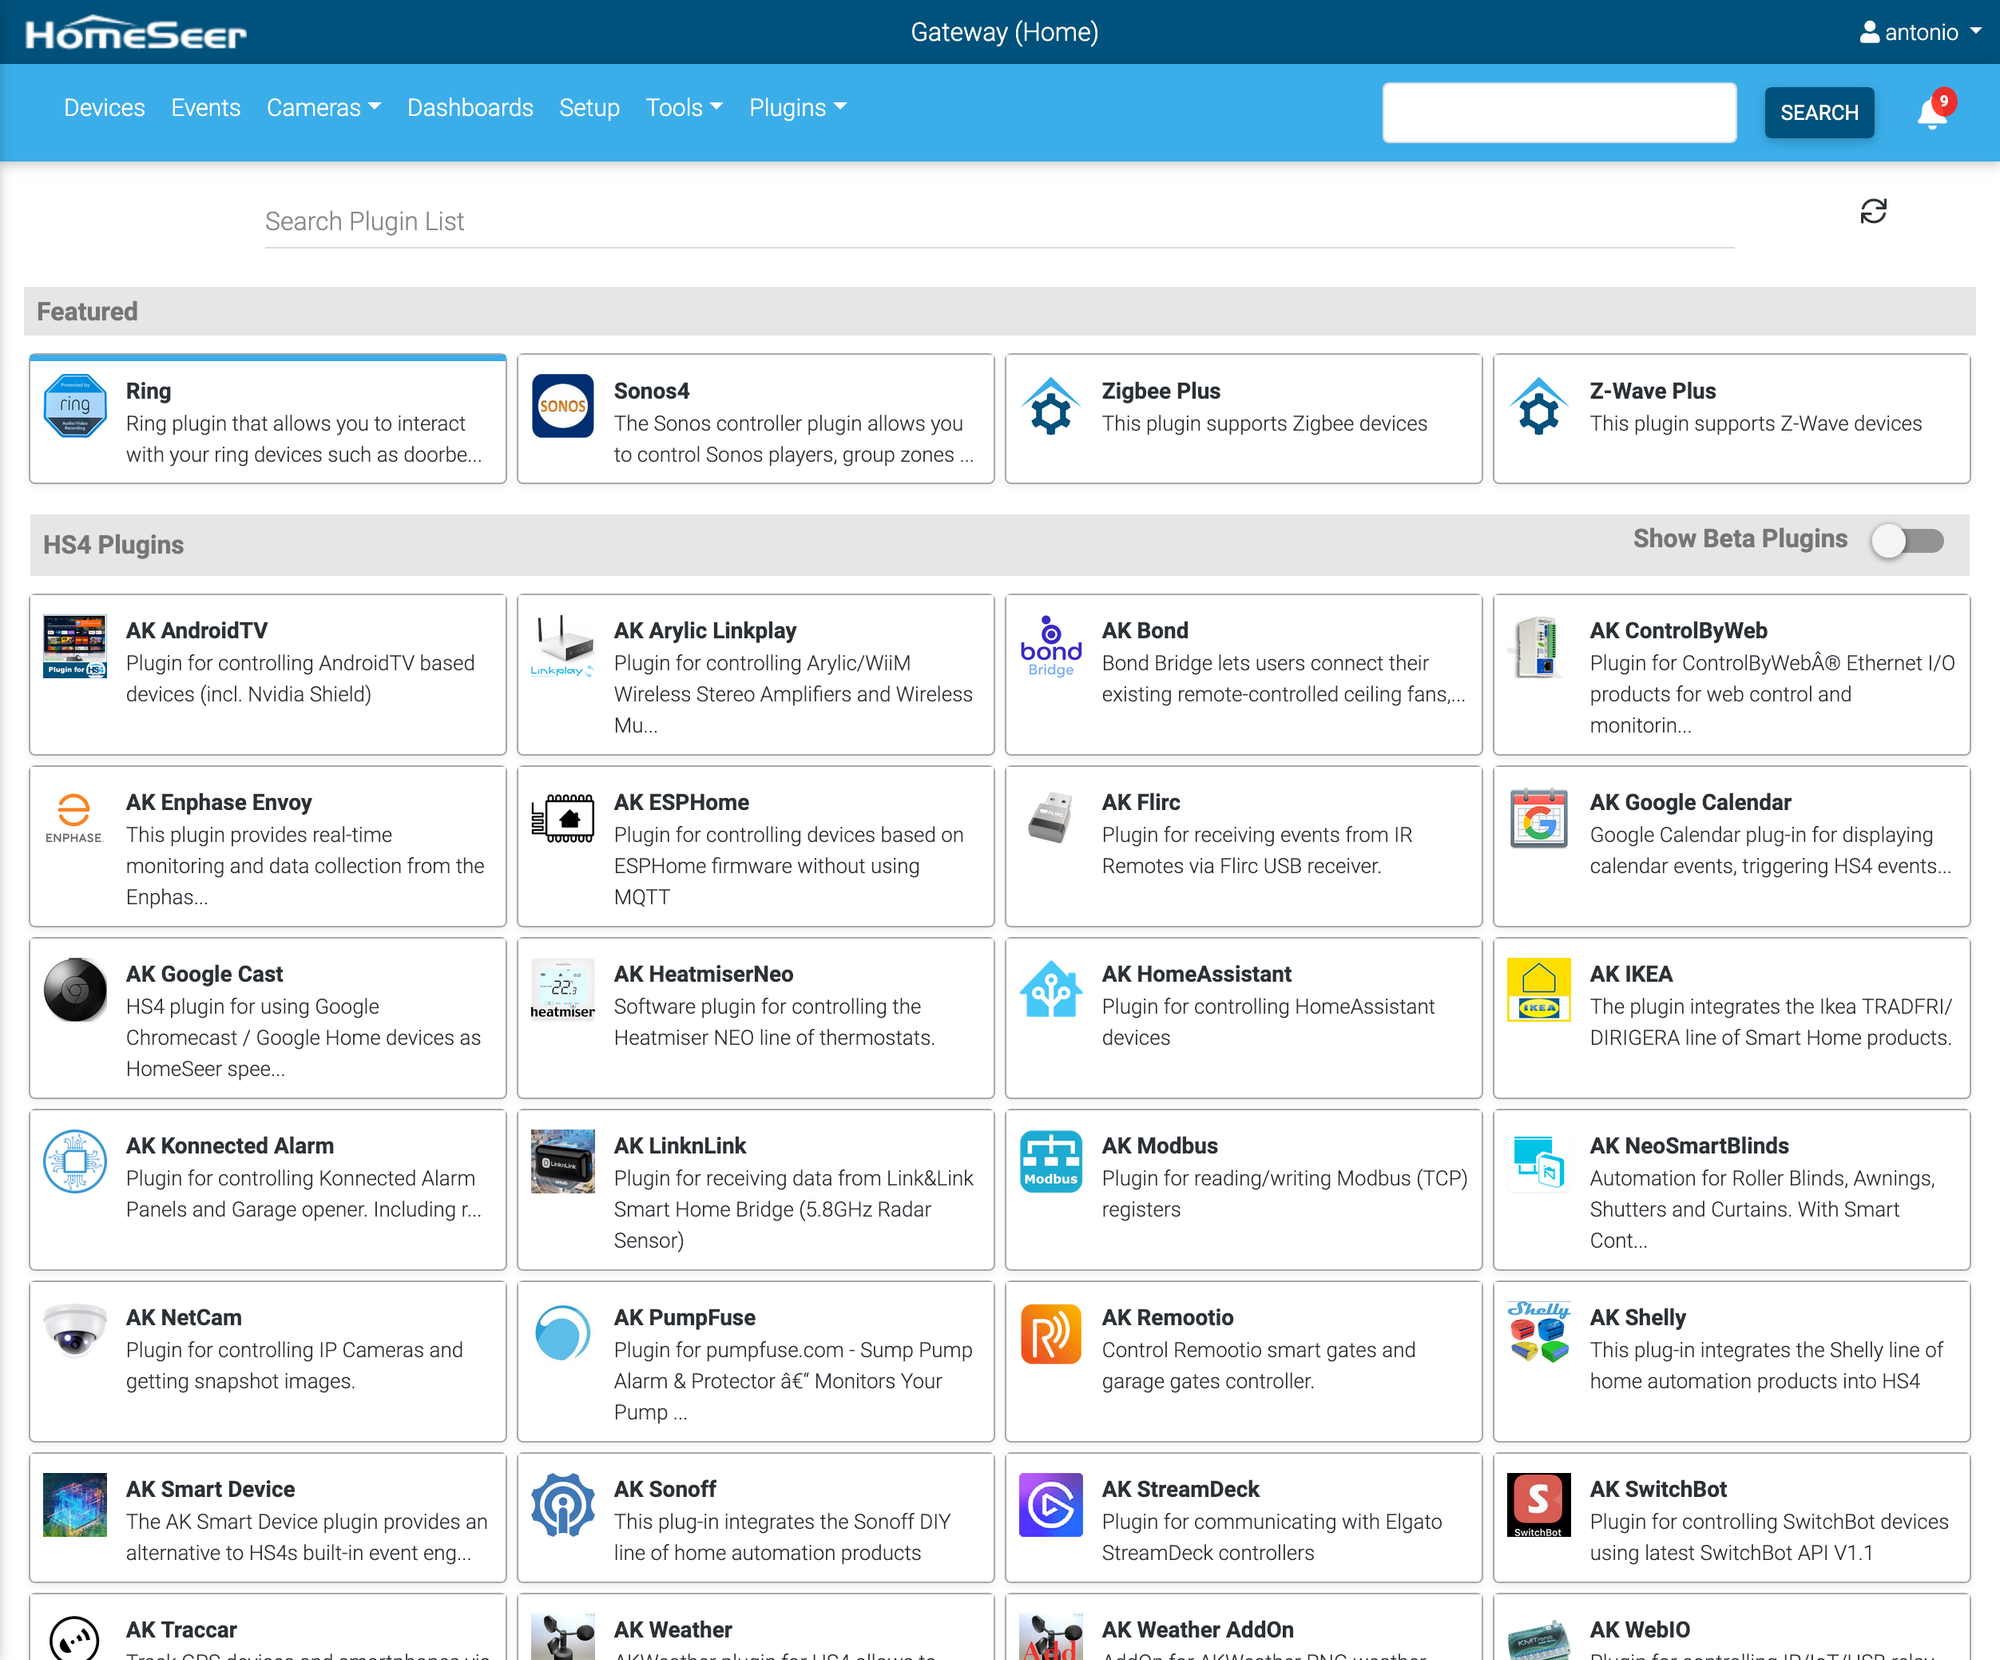
HomeSeer’s integration ecosystem is constantly expanding, thanks to plug-ins—software extensions that add support for new devices, enhance existing features, and enable third-party integrations. Plug-ins allow HomeSeer to communicate with a wide range of smart home technologies, making it one of the most flexible automation platforms available.
For example, support for local protocols like Z-Wave and Zigbee is implemented through plug-ins, just like integrations with popular smart home products such as smart thermostats, media and entertainment, irrigation, weather stations, security systems, and much more. Beyond device support, plug-ins can also enhance HomeSeer’s core functionality—such as keeping device state history, generating graphs and reports, or expanding automation triggers and conditions.
Finding and Installing Plug-ins
HomeSeer makes it easy to discover and install plug-ins directly through its web portal. Some plug-ins are available for free, while others require purchasing a one-time license via the HomeSeer store. All paid plug-ins come with a 30-day free trial, allowing you to test their functionality before committing to a purchase.
Endless Automation Possibilities
By combining HomeSeer’s automation engine with an ever-growing library of plug-ins, you can create truly dynamic and intelligent automations. Whether you want to integrate with new smart home platforms, enhance automation logic, or gain deeper insights into your home’s activity, plug-ins provide endless opportunities to level up your smart home experience.
For inspiration, check out my list of favorite HomeSeer integrations:

Advanced HomeSeer
Scripting: Unlocking Custom Automation
For those comfortable with C# or VB.NET, HomeSeer offers powerful scripting capabilities that allow you to extend its functionality beyond built-in automation tools. Using HomeSeer’s scripting interfaces, you can:
- Query and control devices by enumerating available devices and modifying their features.
- Execute events programmatically to create dynamic automation routines.
- Write to the system log, helping with debugging and monitoring automation behavior.
- Interact with external applications, allowing for deeper integration with third-party software or custom-built services.
HomeSeer provides documentation on scripting basics, including available system interfaces that can be accessed within your scripts. With scripting, you can push HomeSeer’s automation to the next level, enabling complex scenarios that would be difficult or impossible using the built-in event editor alone.
Troubleshooting: Diagnosing Issues in HomeSeer
When things don’t work as expected, your first stop should be the System Log, accessible through the HomeSeer web portal. The log records system events, helping you identify errors, warnings, and potential conflicts.
Since plug-ins also write to the system log, it provides a holistic view of your smart home system. The web portal includes powerful filtering tools, allowing you to:
- Search by time range, narrowing down when an issue occurred.
- Filter by severity (Info, Warning, Error) to focus on critical issues.
- View logs by source, such as a specific plug-in or automation event.
- Use free-text search to quickly locate relevant entries.
What's Next?
In this article, we’ve explored some of the key capabilities of HomeSeer, giving you a solid foundation to understand how it can enhance your daily life and make your smart home truly work for you.
If you’re eager to dive deeper, why not give it a try? Check out our guide on how to build a tiny, affordable, and powerful HomeSeer hub using a Raspberry Pi 4. With minimal effort, you’ll be up and running in no time, ready to explore the full potential of HomeSeer.
Here are a few other resources that will help you on your journey to debug your smart home life:
- Take a look at my favorite HomeSeer integrations. You can use it as inspiration to discover areas of you life that you can include into your HomeSeer automations.
- Expand your HomeSeer mobile features. HSBuddy is a companion application for HomeSeer which I've been developing for the past 9+ years. It gives you a snappy, friendly and intuitive interface for phone, tablet and smart watch. It also brings useful integrations for HomeSeer like location-based routines.
- Access your hub using your custom domain. Check out our step-by-step guide to add direct access to HomeSeer's web portal through a domain of your own (e.g.
homeseer.mydomain.com) as an alternative to MyHomeSeer.