Setup and Deployment
In order to install the apps to the server, you will use a helper script from a terminal. Since the server most likely is a headless computer (no monitor), you will need to open this terminal remotely (for example, using SSH).
The setup script we are going to be using is called hv (short for HomeVault). The source code is available online. It has been tested on Linux, and should support several distributions, including Ubuntu, Fedora, Alpine, etc, including WSL on Windows. It has not been tested on Mac.
[!info] If you run into trouble with the script, feel free to open a new issue on Github
Before getting started, make sure you have the following information available:
- Access to a local terminal on the server -OR- the IP address of the server on the same local network as your laptop or desktop.
- The username and password of an administrator account on the server.
Open a Terminal Window
If your server has a monitor, keyboard and mouse attached, you can follow the rest of the guide on a local terminal window.
Otherwise, you will need to connect to your server remotely. The following are 2 options available to do this:
Option 1: Using Termius
I recommend using Termius, a modern and free SSH client that works on both Windows and Mac.
- From the Hosts tab, click on the New Host button at the top.
- Under Address, enter the IP address of your server
- Give the connection a friendly name under Label
- Enter your Username and Password under Credentials
- Click Connect
Option 2: Using SSH
If you're not using Termius, you can connect to your server by opening a Command Prompt (Windows) or Terminal (Mac) window and typing:
ssh <username>@<server_ip>Prepare Your Workspace
Now, download the script file and other dependencies from the Github repository for this project. The following command will download and unpack the setup files inside ~/homevault/workspace:
[!tip] The following will download the latest available version of the script to your workspace. If you want to download a specific version (for example, to restore an earlier backup of the server, you will find it in the releases page.
mkdir -p ~/homevault/workspace
cd ~/homevault/workspace
curl -fsSL https://github.com/thedebuggedlife/homevault-deployment/releases/latest/download/setup.zip | busybox unzip -n -
chmod +x hv
Running the Setup Script
There should be now a script on your workspace called hv. This script take care of deploying and configuring the applications to the server.
[!info] The script has multiple modes of operation. In this document we will review some basic scenarios. To handle advanced situations, see the Deployment documentation on GitHub.
Installing all applications
Run the following command to install all the applications available in this project, using safe defaults when available. The script will run interactively, prompting you for values that do not provide a safe default (for example, API Keys, passwords, etc.)
cd ~/homevault/workspace
./hv deploy -m all
Installing some (not all) applications
You may not want to install all available applications. The Applications page gives you an overview of the applications available. You can also find a list of all available modules and their exact names using the script:
cd ~/homevault/workspace
./hv modules --all
Once you decide which modules you want to include on your deployment, you can add them to the script using the -m <name> parameter. For example, to deploy a server with the Homepage, Cockpit, and Immich apps, you would run:
cd ~/homevault/workspace
./hv deploy -m homepage -m cockpit -m immich
You can also use this command to add applications to a server that has been previously deployed using the hv script. For example, the following will add the Monitoring package to a running server:
cd ~/homevault/workspace
./hv deploy -m monitoring
Removing applications
If you want to remove an application that was previously installed on the server, you can do it with the --rm parameter. For example, to remove Portainer from a server where it was previously installed, you would run:
cd ~/homevault/workspace
./hv deploy --rm portainer
Navigate your Server Applications
Depending on the modules you deployed to the server, one or more of the following sites will now be accessible. In the examples below, replace yourdomain.com with the actual name of your domain.
[!warn] Important: The first time you deploy the server, it will take several minutes for the websites hosted on your server to be accessible under your domain (e.g. https://immich.yourdomain.com)| Module | Website | Type |
|---|---|---|
| base | https://lldap.yourdomain.com | private |
| base | https://authelia.yourdomain.com | private |
| immich | https://immich.yourdomain.com | public |
| nextcloud | https://nextcloud.yourdomain.com | public |
| homepage | https://home.yourdomain.com | private |
| cockpit | https://cockpit.yourdomain.com | private |
| portainer | https://portainer.yourdomain.com | private |
| monitoring | https://grafana.yourdomain.com | private |
Administrative Sites
Note that not all websites are made available to the open internet. The websites marked as private in the table above can only be accessed from your laptop or phone while connected to your Tailscale network. Because these sites are meant for server management or monitoring functions, they are configured this way for additional security reasons.
Even when connected to Tailscale, you will still need to enter your username and password to access these sites. Only users in the server_admin group are granted access.
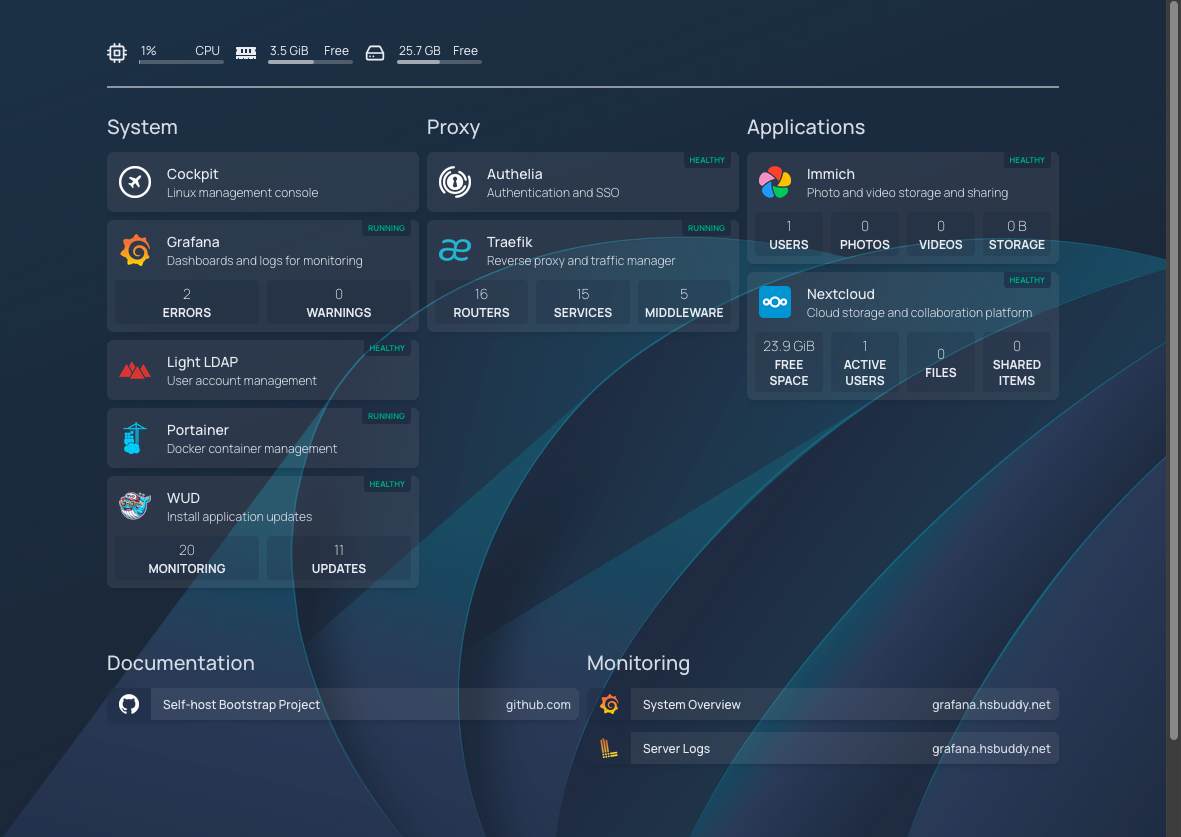
Server Homepage
I strongly recommend including the Homepage module with your server deployment. It will be included if you selected all modules (with -m all) or explicitly (with -m homepage)
When installed, Homepage will serve as collection of bookmarks for all other applications running on your server. You can visit your server homepage at https://home.yourdomain.com -
[!tip] Remember, you will have to be connected to Tailscale in order to access this site, as it is not made available to the open internet for security reasons.