Pre-Requisites
In order to setup your self-hosted solution, you will need to take some preparation steps before you can deploy the applications to your server.
Server Hardware
Choosing the right hardware is essential for smoothly and efficiently running your self-hosted applications. Below are some recommendations to help you select hardware that meets your current needs and provides room for future expansion.
CPU (Processor)
A processor with 4 to 8 cores is typically sufficient for most home setups. More cores generally mean better multitasking and smoother performance when running multiple applications. Since our self-host server will be running 24/7, it makes sense to look for CPU options that offer low-power consumption (25W or less).
RAM (Memory)
A minimum of 8GB should be enough to handle basic self-hosted applications for everyday usage. However, 16GB or 32GB is ideal for future-proofing, especially if you anticipate using multiple applications or memory intensive features (e.g. full-text search for documents in Nextcloud).
Storage Capacity
Your storage needs will depend greatly on how you plan to use your setup. The recommended minimum is 2TB, which is usually adequate for a server storing family documents, photos videos and other personal data.
To future-proof your self-host setup, consider buying hardware that supports future storage expansion with additional NVMe or SATA slots. This will allow you to increase storage capacity as your needs grow over time.
Operating System
The Deployment script provided by this project should be able to run in many different flavors of Linux (Ubuntu, Fedora, etc.). If you are not planning to use a local graphical interface with the server (i.e. running a headless server), I recommend using Ubuntu Server. You can refer to The Ubuntu Server documentation for a Basic Installation guide.
Third-party Services
The applications installed into your server by the Bootstrap Project will require use of a few services offered by third-party providers. The free tier offered by these providers will be sufficient to cover the requirements for a server used by a family or small-team.
Cloudflare
This project uses Cloudflare Tunnels to provide access to public applications running on your server. These applications will be available in the internet, behind a custom DNS name that you will own. For example, https://immich.yourdomain.com.
Follow these steps to setup your custom domain and Cloudflare tunnel:
1. Create an account with Cloudflare
Signing up for Cloudflare is free and their free offering gives us access to all the functionality we need to run our home-lab server (except for the domain name).
To create an account, head to: https://dash.cloudflare.com/login
2. Register a domain with Cloudflare
To register a new domain:
- Go to your dashboard Home: https://dash.cloudflare.com
- Click on Register a new domain (if you don't)
- Follow the rest of the instructions to complete registration of domain
These are some cheap options for new domains: *.cc, *.work, *.org, *.xyz, *.club, *.vip, *.app
To migrate an existing domain:
- Go to your dashboard Home: https://dash.cloudflare.com
- Click on Add a domain
- Enter your existing domain and click Continue (if you own one)
3. Get a token to manage your Cloudflare DNS Zone
We will use this token later during the configuration and deployment phase of the project.
- Go to your dashboard Home: https://dash.cloudflare.com
- On the left-hand options, expand Manage Account then select Account API Tokens
- Click on Create Token
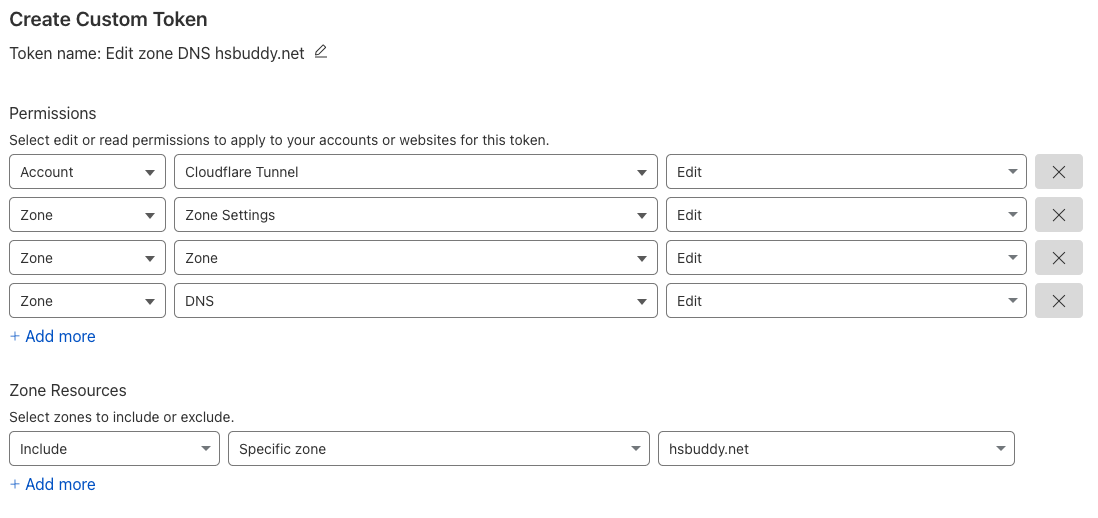
- Look for template called Edit zone DNS and click on Use template
- Edit token name and add your domain at the end (e.g.
example.com) - Make sure that Permissions include the following (see picture below):
- Account - Cloudflare Tunnel - Edit
- Zone - Zone Settings - Edit
- Zone - Zone - Edit
- Zone - DNS - Edit
- Choose your domain under Zone Resources
Example:
- Click on Continue to summary
- Click on Create Token
[!warn] Important: Copy the token and save it somewhere safe. You will need it later during deployment.
Tailscale
This project uses Tailscale to create a mesh VPN and use it to securely provide access to trusted devices to private applications running on the server.
Follow the steps on the Tailscale section to setup your account with Tailscale:
1. Create Tailscale account
Signing up for Tailscale is free. Tailscale integrates with most major identity providers, like Google, Microsoft, Apple. When you sign up, you will be automatically enrolled in the free plan, which includes all the functionality we need for this project.
To create your account, head to: https://login.tailscale.com/start
2. Install Tailscale on personal devices
You only need to install Tailscale on devices that you wish to access the administrator functions of your server, like opening a remote terminal via SSH, or managing users via LLDAP. In most cases, this will be only a single device, such as your primary laptop.
To install Tailscale:
- Go to https://tailscale.com/download
- Select the right version based on your OS
- Authenticate with your Google/Microsoft account
- Connect your device
3. Create an API Token
We will use this token later during the configuration and deployment phase of the project.
- Log into your Tailscale dashboard and go to the Keys section under Settings
- Click on the button Generate access token
- Add a description for your key (e.g. "Self host setup") and give it an expiration time (we only need this key during project setup)
[!warn] Important: Copy the token and save it somewhere safe. You will need it later during deployment.
SMTP2Go
Some of the apps running on your server require access to an SMTP server in order to send emails. For example, to notify recipients of a shared photo album. If you already have access to an SMTP server in order to send emails, you can provide your SMTP server address, username and password during server deployment.
If you do not have access to an SMTP server, follow these steps on the SMTP2Go section to setup an account for free:
1. Create an account
You will need to open a new account with SMTP2GO, which includes enough capacity in its free tier for our use case.
To open your account, head to: https://www.smtp2go.com/
2. Create an API token
The setup script on this project takes care of configuring your SMTP2GO account and validate your Cloudflare domain, which is a pre-requisite to sending email from a custom domain. In order for this process to be automated, you just need to provide an API token during configuration.
In order to get the token:
- Log into your SMTP2GO account
- On the left-side menu, expand the Sending section and click on API Keys
- On the main section of the screen, find and click on the Add API Key button
- Under Details, enter a meaningful description for the key (e.g. "Self-host service administration")
- Switch to the Permissions tab
- Modify permissions so that only the following ones remain enabled:
- Sender Domains
- SMTP Users
- Click on Add API Key
- Back on the API Keys page click on the Copy button.
[!warn] Important: Copy the API Key and save it somewhere safe. You will need it later during deployment.
Computer software
To make it easier to deploy the server from your personal laptop, I recommend installing the following software:
SSH Client
Since our server is a headless device (no monitor or keyboard attached), we will use an SSH client to remotely run commands on the server. I recommend installing Termius. There is a free version for Windows and Mac available.