Online ads have become more invasive, heavier, and harder to escape—slowing down pages, draining battery, and compromising privacy. While browser extensions help, they don’t cover every device, and they often miss in-app ads or smart TVs entirely.
Enter Pi-hole: a lightweight DNS-based ad blocker you can run on a Raspberry Pi or any Linux machine. It silently filters requests across your network, giving all connected devices a cleaner, faster, and more private experience.
What is Pi-hole?
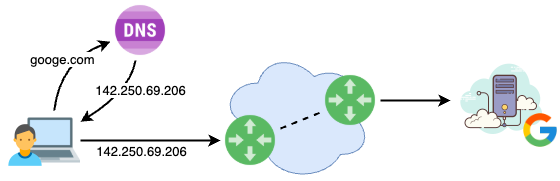
To understand what Pi-hole does, it’s helpful to first understand how the Domain Name System (DNS) works. Every time you visit a website, your device needs to convert a human-friendly domain name—like example.com—into an IP address that computers use to communicate, like 93.184.216.34. This process is called a DNS lookup, and it happens constantly in the background as you browse, stream, or use apps.
Normally, your device sends these DNS requests to servers provided by your internet service provider (ISP) or a third-party like Google (8.8.8.8) or Cloudflare (1.1.1.1). These servers look up the domain and return the corresponding IP address so your device can connect to the right server.
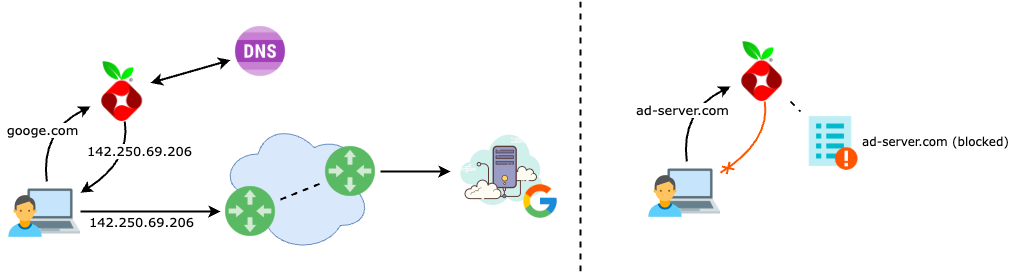
Pi-hole inserts itself into this process. It acts as a local DNS server on your network. When a device asks for the IP address of a domain, Pi-hole checks the request against a list of known ad-serving or tracking domains. If the domain is on the blocklist, Pi-hole doesn’t resolve it—it just returns a null IP address or redirects it to nowhere. The result? The ad never loads.
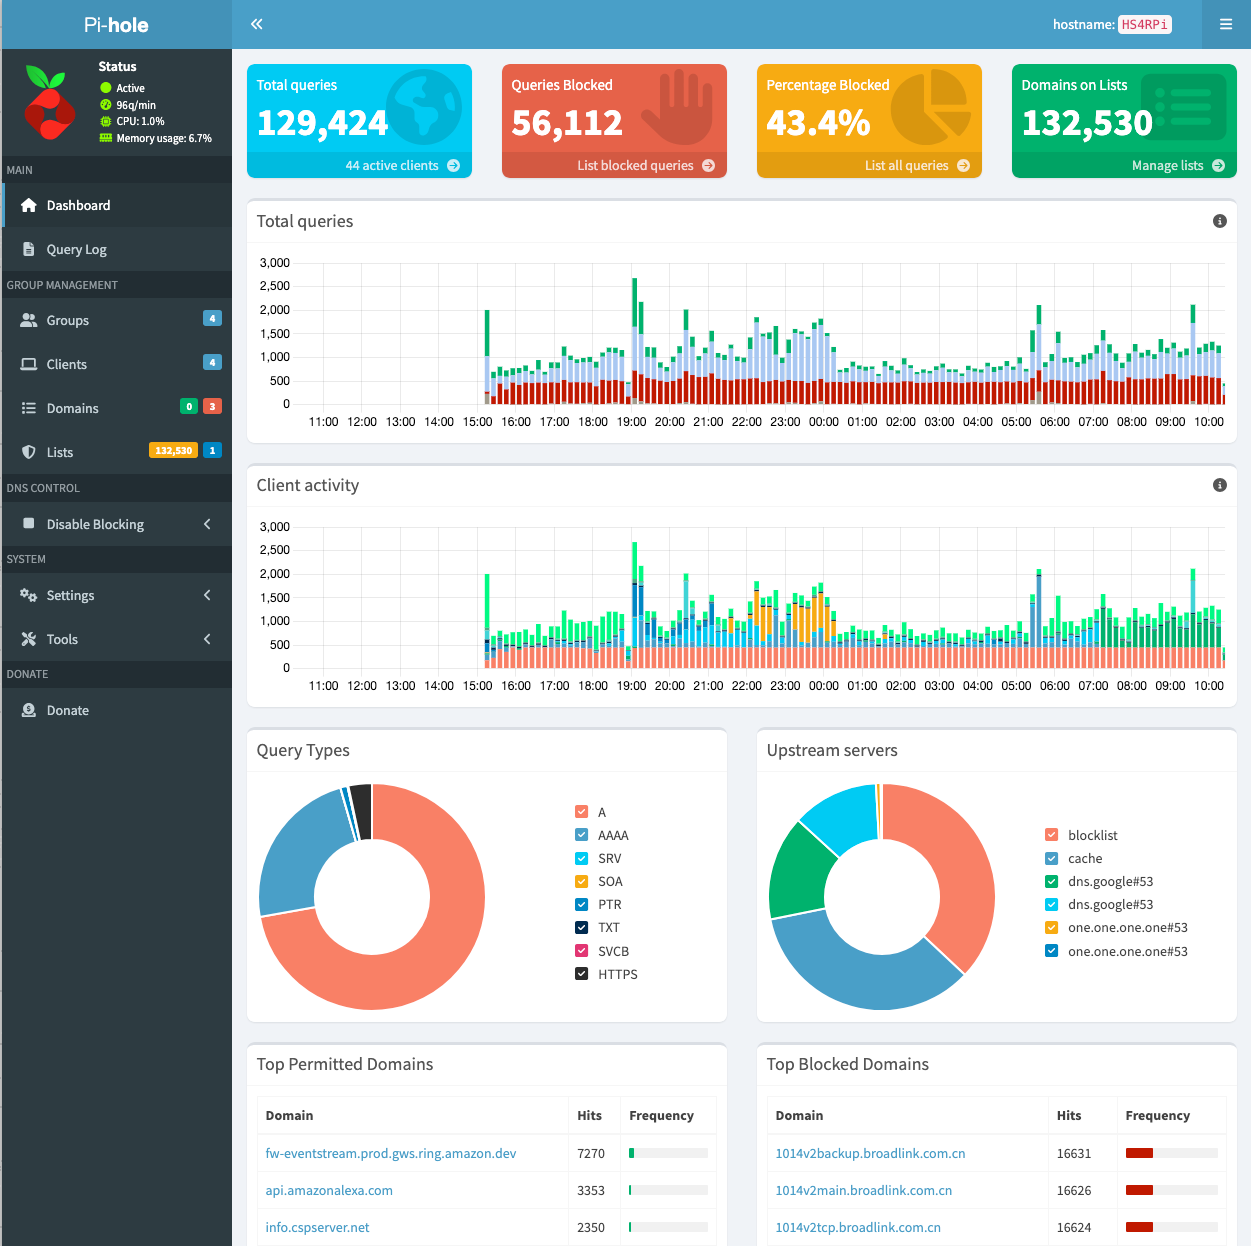
You can think of Pi-hole as a network-wide ad blocker and DNS sinkhole. Instead of each browser needing its own ad blocker extension, Pi-hole silently handles the job for the entire network. It also gives you insight into what domains your devices are contacting, which can be surprisingly revealing—and useful for spotting misbehaving apps or unnecessary background chatter. With an easy-to-use web interface, you can view logs, see which domains are being blocked, and tweak your allow/block lists as needed.
By the way, Pi-hole is open source software, built and maintained by a community of developers who generously donate their time to make tools like this freely available to everyone. If you find Pi-hole useful, consider supporting the project with a donation—it’s a great way to say thanks and help keep it going.
What We'll Need
If you can afford it, I recommend running Pi-hole on a dedicated Raspberry Pi because it becomes a critical dependency for your network’s DNS resolution. If you install it on a machine that you occasionally reboot for maintenance or use for other experiments, you risk interrupting internet connectivity for all devices on your network. Keeping Pi-hole isolated also eliminates the possibility of other services—especially misconfigured ones—interfering with DNS resolution or consuming system resources unexpectedly.
This guide will show you how to set up Pi-hole using the same configuration I used at home. Here is what I used and recommend using as well:
- A Raspberry Pi. I think a Raspberry Pi 4 with 2GB of RAM is more than enough power for a node that is dedicated to running Pi-hole. However, I have found kits with a 4GB Raspberry Pi 5 that run almost as cheap, like this one, and include all the hardware needed to run it. You can install Pi-hole in any Linux-based server you already have at home, but make sure to read my note at the beginning of the section.
- Docker and Portainer. Optional, but the combination makes our system more portable and easier to administer and troubleshoot. If you need a quick refresher, check out the articles on Docker Setup, Portainer Server and Portainer Agent.
- Basic administrator familiarity, with Linux and your home router.
Installing Pi-hole
There are a few ways to install Pi-hole, and I’ll walk you through the three most common ones. Pi-hole offers an official installation script that sets everything up directly on your device. It’s straightforward and works well for most users.
Personally, I prefer using Docker alongside Portainer. Docker gives me better isolation and control—making it easier to upgrade, modify, or remove Pi-hole without affecting the rest of my system. Portainer adds a simple web-based interface that lets me deploy containers like Pi-hole without needing to SSH into the server.
Feel free to choose the method that works best for you. Whichever route you take, you’ll end up with a working Pi-hole instance accessible via your server’s hostname (or IP address), plus the appropriate port and protocol (http or https) you selected during setup.
Installing With Portainer (recommended)
- Log into your Portainer Server admin website. Make sure you have configured Portainer to load App Templates from our GitHub repository.
- From the Home dashboard, select the Environment for the server where you want to deploy Pi-hole.
- Under Templates > Application, search for and select the template for Pi-hole.
- Under Configuration, set the Network variable to host.
- If you wish to use a different network, read the Network Configuration section under Information at the top of the template.
- Also under Configuration, set the Web Server Password to a secure value, and also save this password somewhere safe (preferably a password manager)
- If you need to change the default ports where the admin website will be available (80 and 443 are the defaults for http/https respectively) read the Network Configuration section under Information at the top of the template.
- Click on Deploy the container.
Installing With Docker
- Open a terminal in the server where you want to install Pi-hole, e.g. via SSH if your server is headless.
- Create a docker-compose.yml file using the Pi-hole documentation as reference. Make sure to replace the environment variable for the Web Server Password, which is:
FTLCONF_webserver_api_password - Review and make any necessary changes to the host mapped ports where the admin website will be available.
- Create and start the container with:
docker compose up -dInstalling via Script
I recommend using this method only if you are installing to a server that will be dedicated to running Pi-hole only
- Open a terminal in the server where you want to install Pi-hole, e.g. via SSH if your server is headless.
- Run Pi-hole's install script:
curl -sSL https://install.pi-hole.net | bashConfiguring Your Network
In this section we will explore how your home network normally works, and how Pi-hole fits in. Then we'll discuss how to make the necessary configuration changes to your router.
How Your Home Network Normally Works
Before diving into how to configure your network to use Pi-hole, it’s helpful to understand how most home networks are set up—and how devices figure out where to send DNS queries in the first place.
At the center of your home network is typically a router, which acts as:
- The default gateway, routing traffic between your local network and the internet.
- A DHCP server, assigning IP addresses to devices when they connect.
- A DNS forwarder, handling name lookups by passing them to external DNS servers (like Google or Cloudflare).
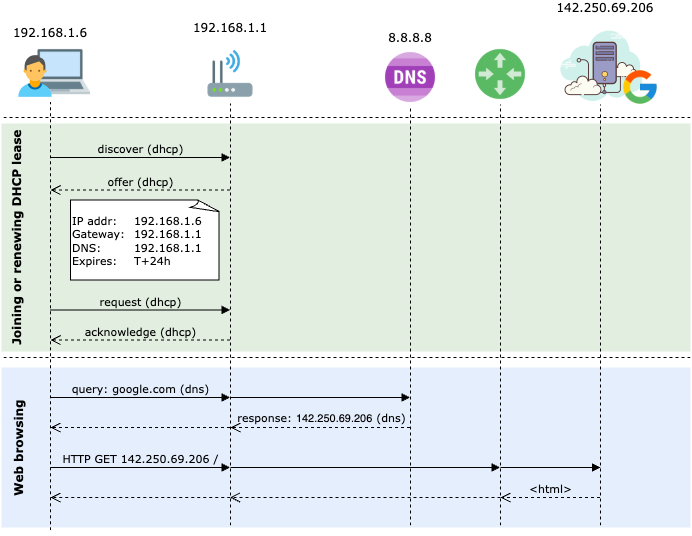
When a device connects to your Wi-Fi or wired network, it uses DHCP (Dynamic Host Configuration Protocol) to request an IP address. The DHCP message exchange includes the following messages: Discover, Offer, Request, Acknowledge (DORA). By the end of this process, the device obtains the following from the DHCP server:
- An IP address for the device.
- The router’s IP as the default gateway.
- A DNS server address (often the router itself, or an upstream provider).
How Does Pi-Hole Fit In
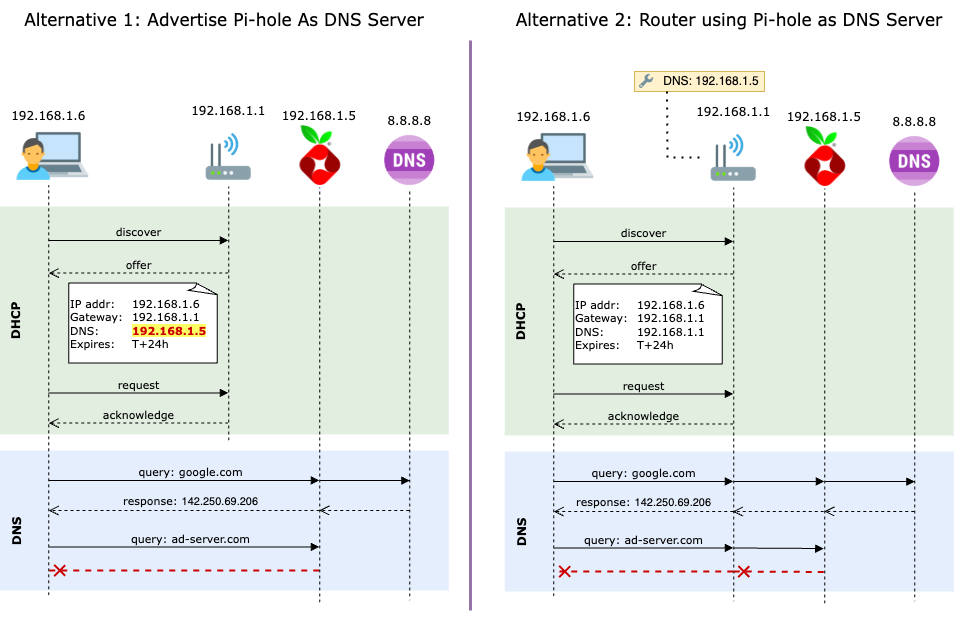
To make sure all your devices benefit from Pi-hole’s DNS-level blocking, there are two main ways to integrate it into your home network:
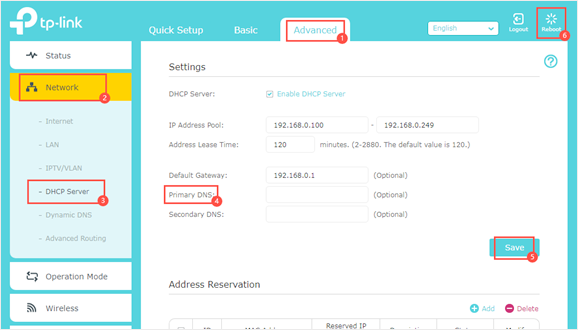
- Advertise Pi-hole via DHCP. The ideal approach is to configure your router’s DHCP settings to advertise Pi-hole as the DNS server. This way, every device on your network will send DNS queries directly to Pi-hole, bypassing the router’s built-in resolver. Many modern routers (like Eero, TP-Link Deco) and those running custom firmware (OpenWRT, DD-WRT, Tomato, etc.) support this option. However, some older or ISP-provided routers may not offer the flexibility to change DHCP-assigned DNS settings.
- Use Pi-hole as your router’s upstream DNS. If your router doesn’t support custom DHCP options, you can configure it to use Pi-hole as its DNS server while still advertising its own IP as the DNS for client devices. In this setup, all DNS queries are funneled through the router to Pi-hole. This still blocks ads and trackers effectively, but it comes with a tradeoff: Pi-hole won’t be able to distinguish which specific device is making each request, which limits features like per-client filtering or query logging by device.
Configuring Your Router
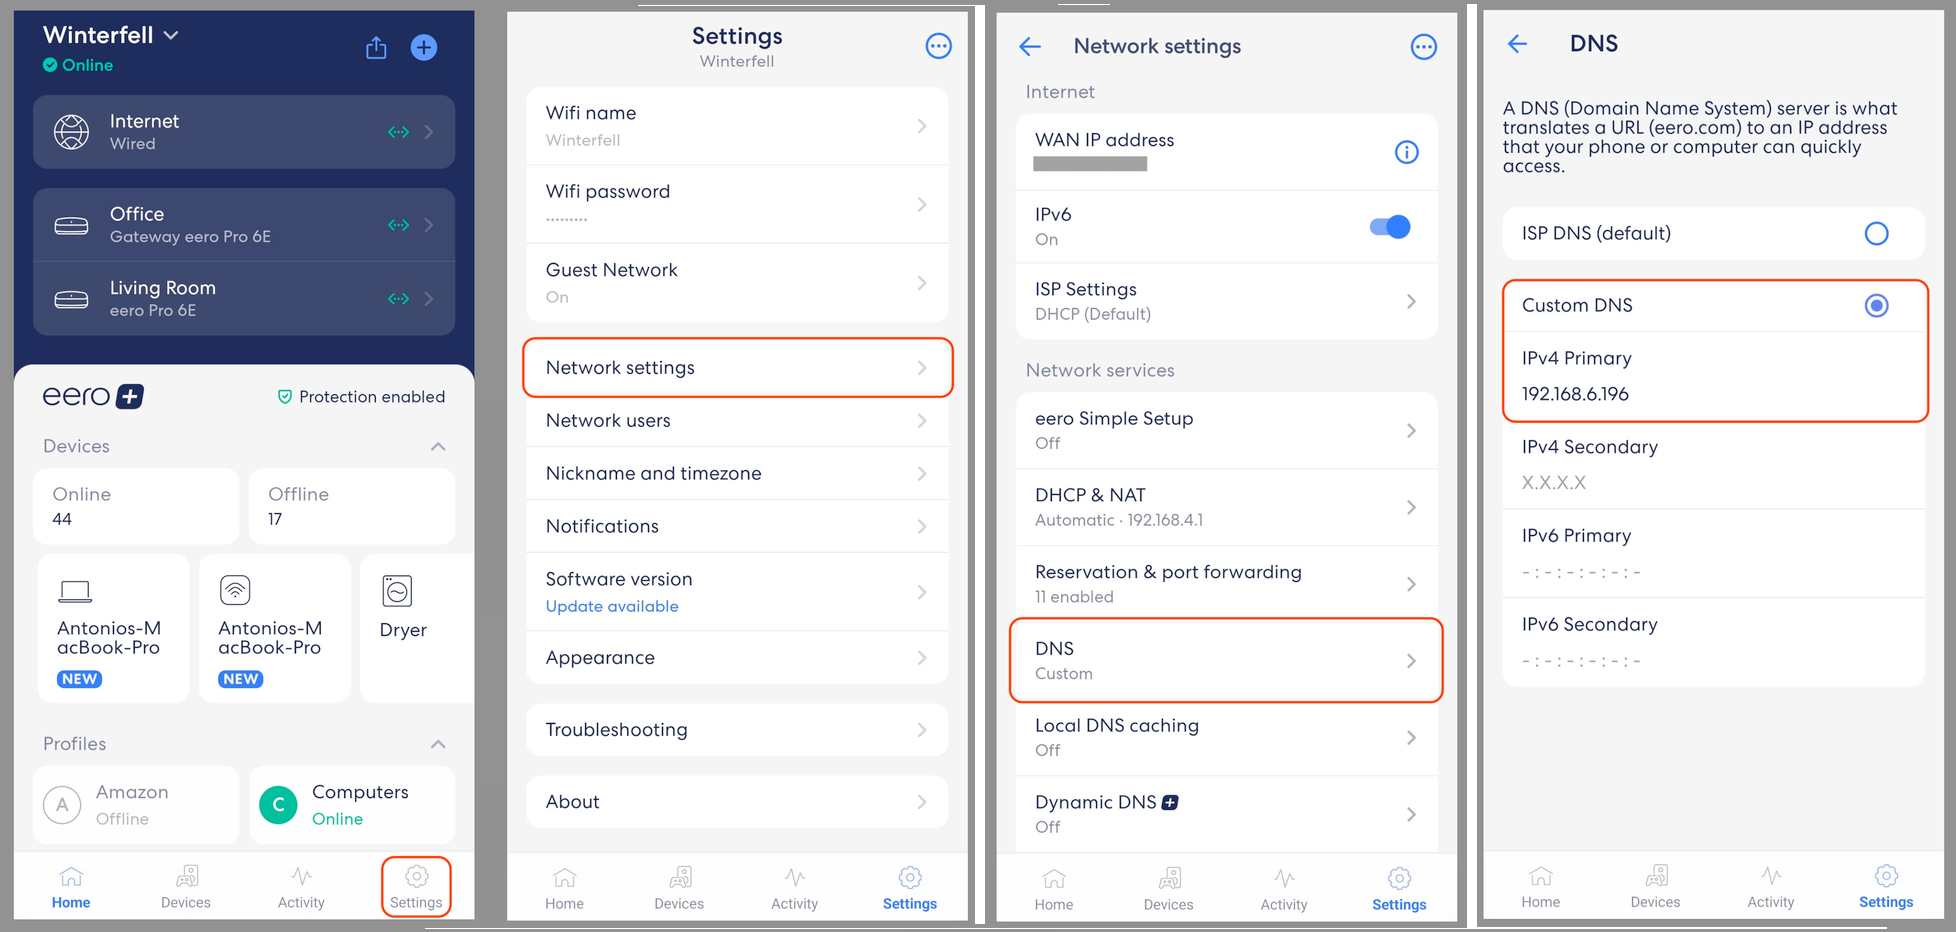
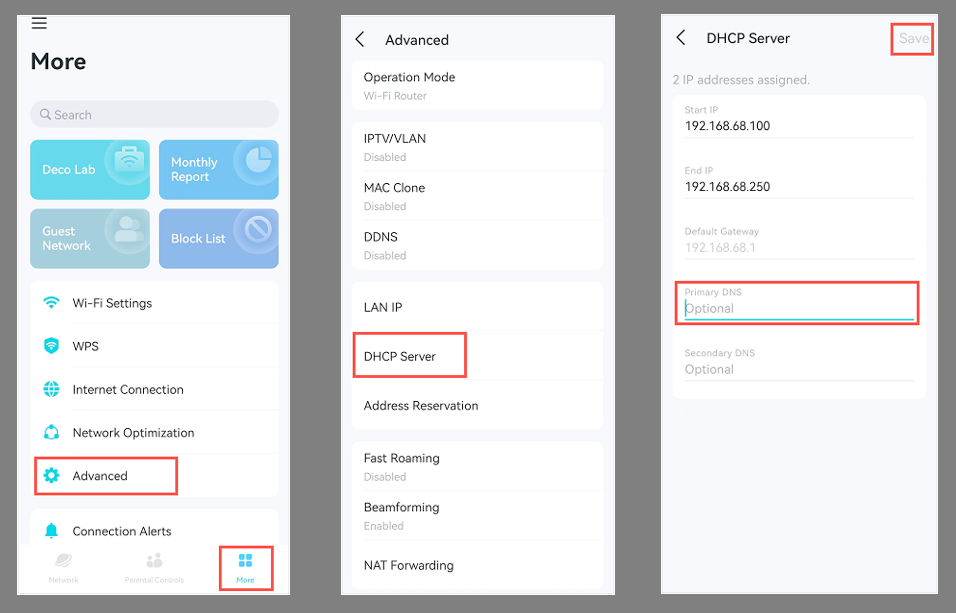
The exact steps to update your router’s DNS settings vary depending on the brand and model. Most modern consumer routers require you to use a mobile app to make changes. Look for a section labeled Network Settings, Advanced Settings, or something similar—within that, you should find an option to set a custom DNS server. When you update this value, the router will usually pass the new DNS address to all connected devices via DHCP.
For routers with custom firmware—or older models—you’ll typically need to access the router’s web-based admin interface. From a device on your home network, navigate to http://<gateway_ip> (usually something like http://192.168.0.1 or http://192.168.1.1). Once logged in, find the section where DNS or DHCP settings are configured. Depending on the manufacturer, this may be under Internet Settings, DHCP Settings, or LAN Settings.
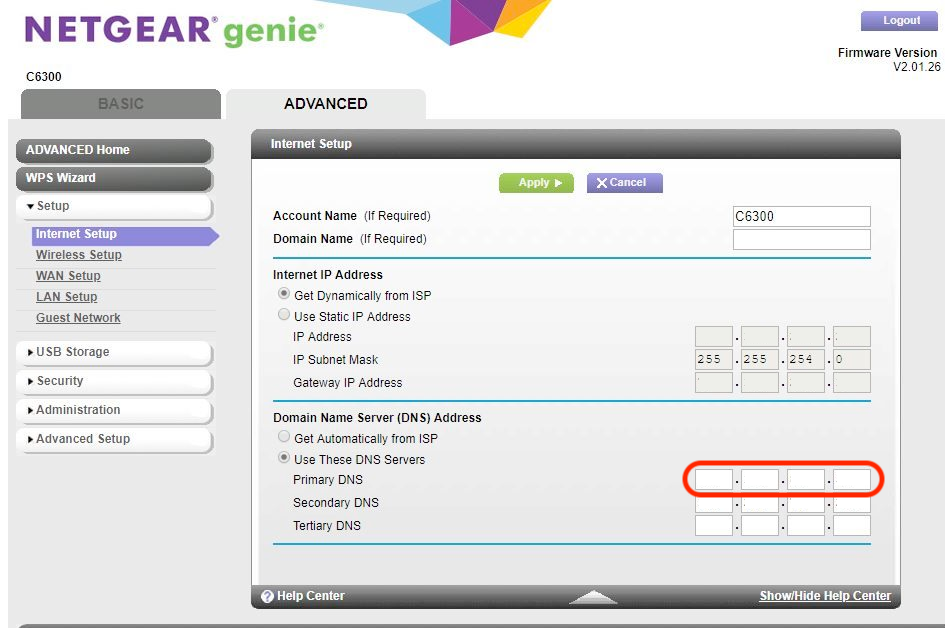
Be sure to replace any existing DNS entries with the local IP address of your Pi-hole. After saving the changes, reboot your router or renew the DHCP lease on your devices to ensure they start using Pi-hole for DNS.
Testing Your Pi-hole Setup
Once you’ve got Pi-hole up and running, it’s a good idea to test how well it’s actually blocking ads and trackers. A great tool for this is the AdBlock Test by TurtleCute, a browser-based test that simulates real-world ad and tracking scenarios to give you a blocking score.
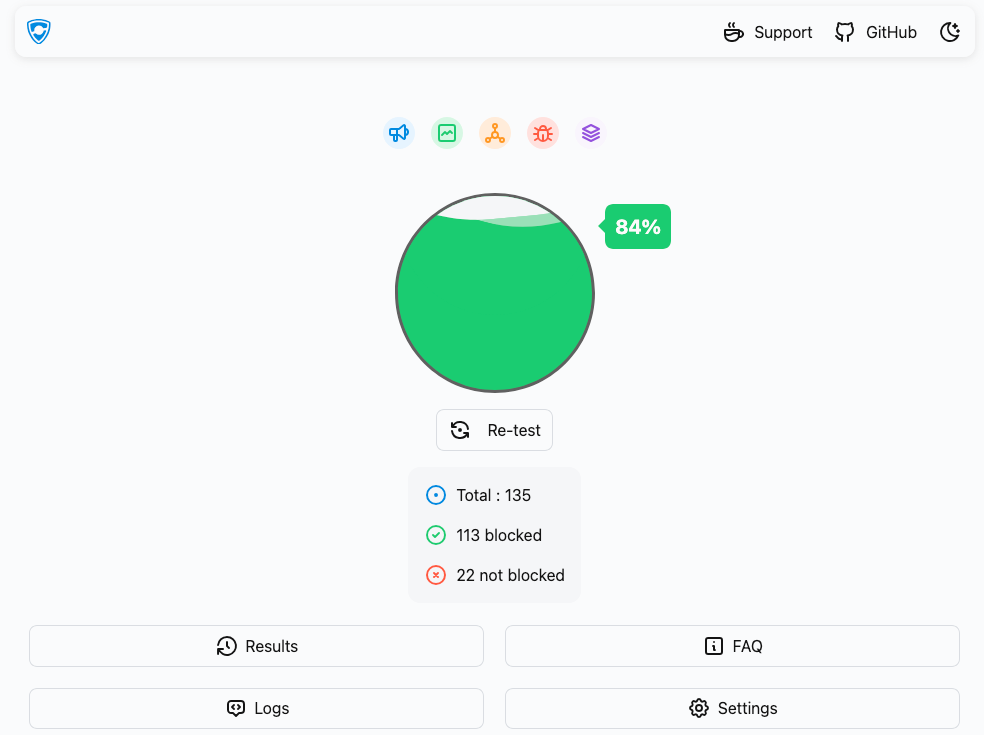
With Pi-hole’s default configuration, you’ll likely score around 65%, which is already a significant improvement over a typical unprotected setup. Pi-hole’s built-in blocklists target known ad and tracking domains at the DNS level, cutting off many ads before they can even load.
To improve your score, you can add a curated blocklist maintained by the developer of the TurtleCute test. This list is tailored to block additional domains that slip through the default configuration. To do this:
- Navigate to your Pi-hole's admin website and click on Lists on the right-side menu.
- Copy and paste this link into the Address box at the top and click on Add blocklist.
- On the right-side menu, expand the Tools section and click on Update Gravity. Then click on the Update button on the main panel.
The page will display the status as Pi-hole updates the list of blocked domains from its configuration. Once the operation completes, you can navigate back to the TurtleCute test and click on Re-test.
In my own testing, adding the list from TurtleCute bumped my score from 65% to 85% without using any Browser Extension.
Combining Pi-hole With Browser Extensions
Keep in mind that Pi-hole can’t block everything. Some modern ad techniques use the same domains as legitimate content, or rely on inline scripts and page elements. These can only be removed with browser-based ad blockers like Adblock Plus (my favorite), uBlock Origin or AdGuard, which operate at the page level. Combining Pi-hole with one of these extensions can push your score closer to 95% or higher, while also dealing with in-page annoyances like pop-ups, floating video players, and cookie banners.
The downside of browser extensions is that they only work in, well, web browsers—so while they can block page elements effectively, they don’t help with ads in apps, games, or on devices like smart TVs. That’s where Pi-hole shines: by acting as a DNS filter at the network level, it protects all devices on your network, even those that can’t run extensions.
Testing your setup regularly is a great way to fine-tune it and make sure you’re getting the most out of your self-hosted ad blocker.
What's Next?
Now that your Pi-hole is up and running—silently blocking ads across your entire home network—you’re already enjoying a faster, cleaner, and more private internet experience. But there’s still more you can do to build on this setup. Here are a few ideas to take it further:
- Explore your network activity. Log into the Pi-hole admin dashboard and dig into the query logs. You might be surprised by what you find. In my case, several devices were quietly making DNS requests to
*.cndomains that weren’t essential to their core functionality. It’s a great way to gain visibility and uncover potentially unwanted background activity. - Extend protection to mobile devices on the go. While modern mobile browsers are starting to support ad-blocking extensions, many apps—like Twitter (X), email clients, or in-app browsers—completely bypass them. With Tailscale and a simple DNS override, you can route all your mobile DNS traffic through your Pi-hole, no matter where you are (on the road, coffee-shop WiFi, etc.). This brings network-wide blocking to every app on your phone, not just the browser.
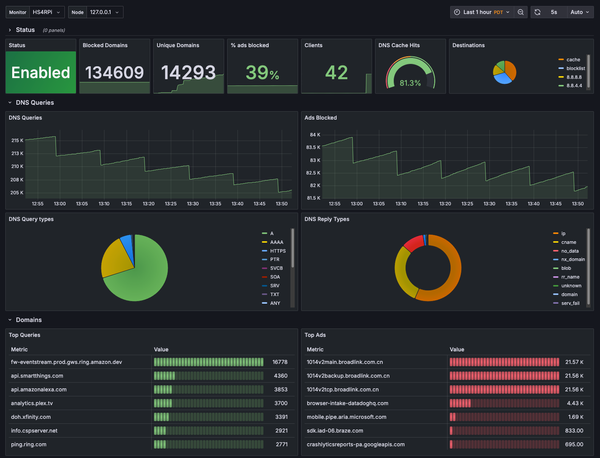
- Monitor Pi-hole with Prometheus + Grafana. If you already use Prometheus and Grafana to monitor your infrastructure, check out pihole-exporter. It integrates your Pi-hole metrics into your dashboard, giving you real-time insight into query volume, block rates, and more. Stay tuned—I’ll walk through this setup in a future post.
- Quick controls via browser extension. Want to quickly pause or manage Pi-hole without logging into the admin interface? There is a browser extension for Chrome (and other Chromium-based browsers) and Firefox that hook into the Pi-hole API. With a single click, you can enable/disable blocking or add the current page’s domain to your allow- or block-list—handy for those moments when something legitimate gets caught in the filter.